Using Linkly at Point of Sale
After you set up your Linkly Merchant account and you pair the device with the station, you are ready to use the Linkly device to process payments in transactions. You can process the sale for the total amount using one payment type or multiple payment types if you need to. If you have authorized the Cash Back (or Cash Out in some regions) feature, you can also provide cash to the customer, when requested. You can process payments for Sales, Orders, Advice Notes, Direct Shipments, Payments, and Payouts, but not Charge Returns. The item entry part of the transaction is the same, so we pick up the transaction before you select Process (F12).
![]()
Sale Entry Form with Items Entered
Using Linkly to Process a Transaction
To use the Linkly device in a transaction:
1. The Cashier selects Process (F12) to process the transaction. The Process Document box displays.
2. The Cashier selects the transaction type (Cash (F1), Bankcard (F2), etc.) based on the customer’s selected payment type. As an example, we are processing this using a bankcard.
![]()
Process Invoice Document > Bankcard Option
3. The Cashier selects Finish (F12) and accepts any warnings that display.
If your business has Cash Back enabled, the prompt below displays. The Cashier selects Cash Back if the customer wants cash back (cash out). The Enter Cash Back Amount prompt displays.
![]()
![]()
Station: Cash Back Prompt and Enter Cash Back Amount Entry
4. The Cashier enters the cash amount and selects OK. The application displays the Authorizing BankCard Amount message. The Linkly device updates with the purchase total and a prompt to swipe the card.
5. The Cashier/Customer swipes the card and the card information displays. The Select Account CHQ, SAV, or CRD message displays on the Linkly device.
6. Choose the CRD option. The Enter PIN prompt displays.
7. Ask the customer to enter the PIN for the card and click OK. The device processes the payment and displays an approved message when the transaction is successful.
![]()
Linkly Device: Approved Receipt
7. The Process Invoice Document displays the amount to be given to the Customer.
8. Press the Space Bar to close the transaction in the application.
Processing a Transaction with Multiple Payment Types
Sometimes a customer wants to use more than one payment type to complete their transaction. Often this includes gift cards that don’t cover an entire balance or the customer doesn’t have enough room on one credit card for the entire amount. When this happens, the Linkly device processes one transaction at a time and prompts the Cashier to present another payment type to process the remaining amount. When this occurs, a prompt like this, displays:
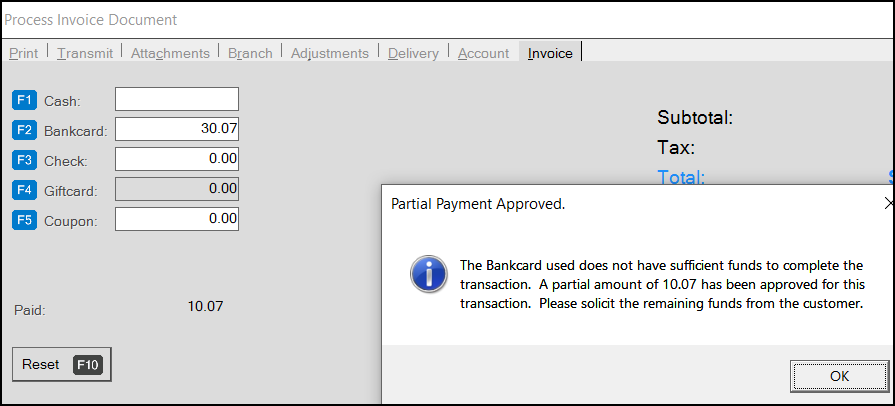
Process Invoice Document with Partial Payment Approved Message
When this message displays, the Cashier clicks OK, the Process Document subtracts the amount approved for the sale and presents the remaining amount as a new transaction. This is Linkly’s expected process. Continue by asking the customer for an additional form of payment and complete the transaction process.
Reprinting the Last Linkly Receipt
When a customer returns to the register, you can print a duplicate receipt if you have not processed another transaction after it.
To reprint the last receipt:
1. From the Main Menu, choose Point of Sale > Sales to display the Sale Entry form.
2. Without entering anything in the data grid, choose Process (F12) to display the Process Invoice Document.
3. Select Bankcard (F2) to display the Split Bankcard button and the Menu Marker .
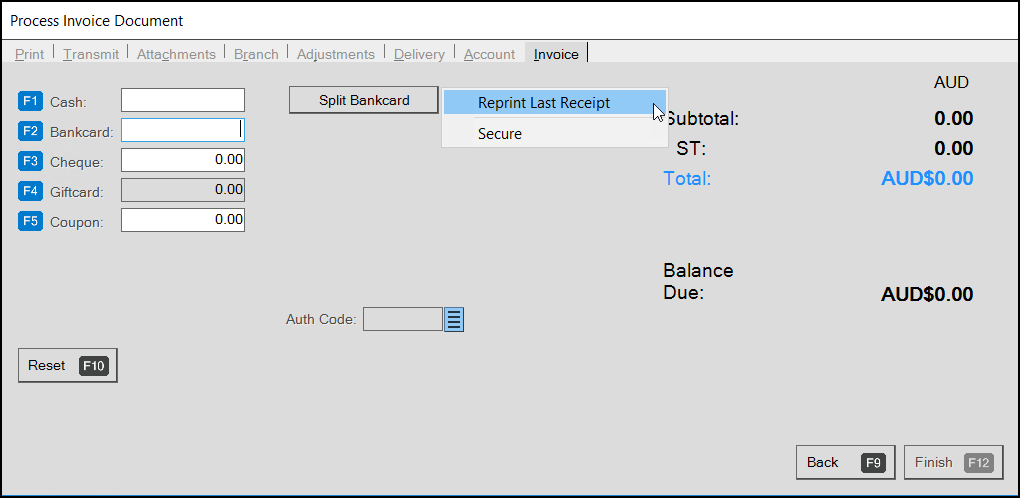
Process Invoice Document with Reprint Last Receipt Option Selected
4. Right-click the Menu Marker  and choose the Reprint Last Receipt option. A confirmation prompt displays.
5. Click Yes. The Linkly device prints the duplicate receipt.
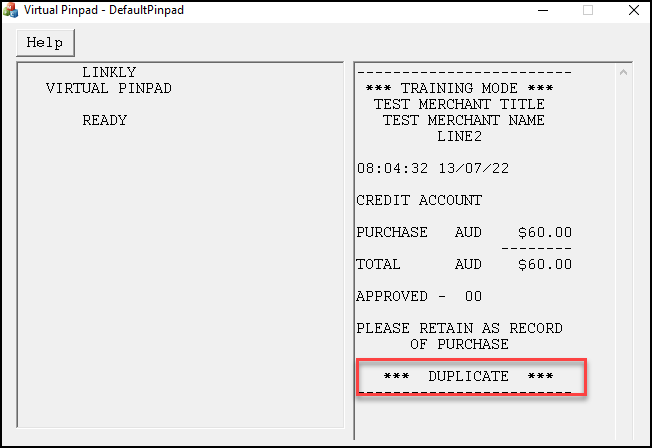
Linkly Device: Showing Duplicate Receipt
Refunding Linkly Sales to a Customer’s Card
The Linkly refund process follows the same path as other card processing device refunds. Follow the process below to refund a customer’s payment to a valid bankcard. This process assumes that the customer has purchased material from your business and that you can find the transaction document associated with that purchase.
To refund a sale to a bankcard using a Linkly device:
1. From the Main Menu, choose Point of Sale > Sales to display the Sale Entry form.
2. From the Name field, choose the account or choose the cash account.
3. In the data grid, enter the material the customer wants to return and choose Process (F12).
The Item Return box displays.
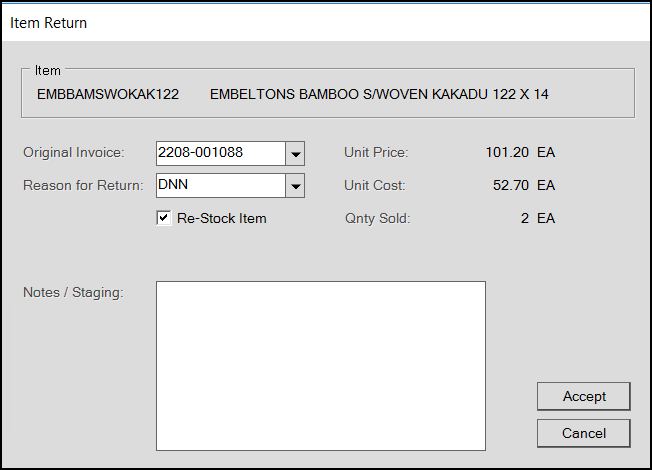
Item Return Box with Transaction Information
4. In the Original Invoice field, select the customer’s invoice record for the materials they are returning.
5. From the Reason for Return list, choose the customer’s reason for returning the material and check the Re-Stock Item check box if you are returning the material to inventory.
6. In the Notes section, enter any relevant notes about the return. (Not Required)
7. Choose Accept. The Process Document displays.
8. Select Bankcard (F2) to refund the transaction amount to the customer’s card.
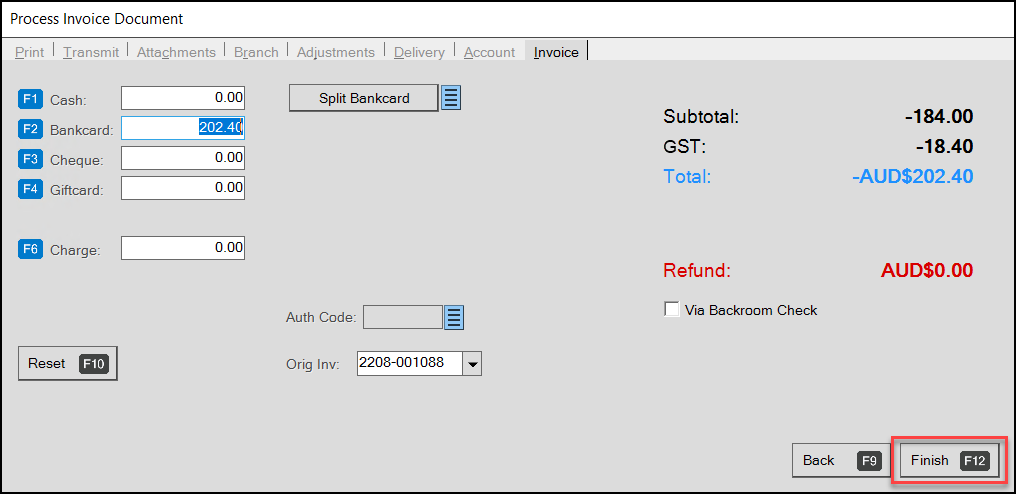
Process Document with Refund Amount in Bankcard Field
9. Choose Finish (F12) to process the return.
The Linkly device prompts you to swipe the customer’s bankcard.
10. Swipe the customer's card and select the account type. The Enter PIN prompt displays.
11. Ask the customer to enter the PIN number and click OK. The Linkly Device displays the refund confirmation.
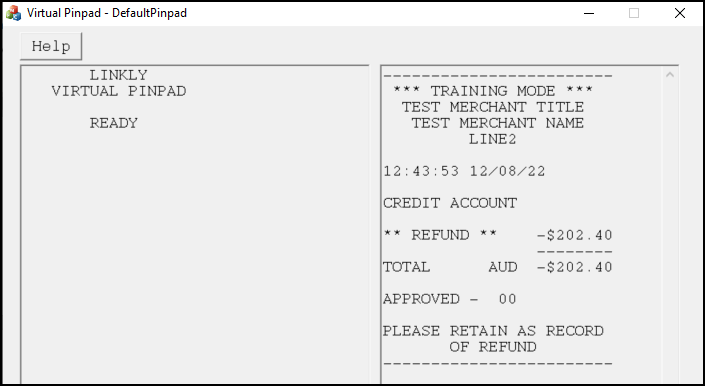
Linkly Device: Receipt Confirmation
Cancelling Sales on the Linkly Device (Cashier)
The Cashier can cancel a Linkly-based transaction when necessary. If the customer decides that they want to cancel the transaction after they have already swiped the card, the BankCard Verification (Linkly) prompt displays.
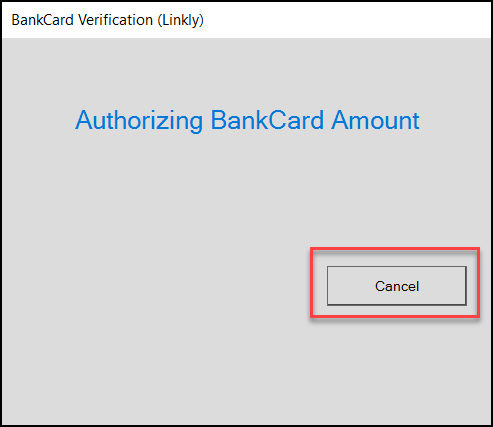
Application: Authorizing BankCard Amount with Cancel Highlighted
Click Cancel to cancel the transaction. A confirmation message displays.
Click Cancel again to display the Process Document box. Choose Back (F9) to return to the Entry window and cancel the transaction.
Processing Linkly Payments using Manual Entry (Hosted Payment Page) (AU)
Customers who use Linkly devices asked us to find a secure way to process payments for MOTO (Mail Order / Telephone Order), Card On File, with standard Visa, Mastercard, American Express, Discover, Apple Pay® / Google Pay® payment methods.
To securely handle these types of payments, we have added a FiServ remote plug-in that delivers a manual entry and card on file boarding process that is both quick and secure. Using this plug-in, a Hosted Payment Page displays on your local stations to complete these transactions. You can process FiServ remote plug-in payments for Sales, Orders, Direct Shipments, and Charge Returns.
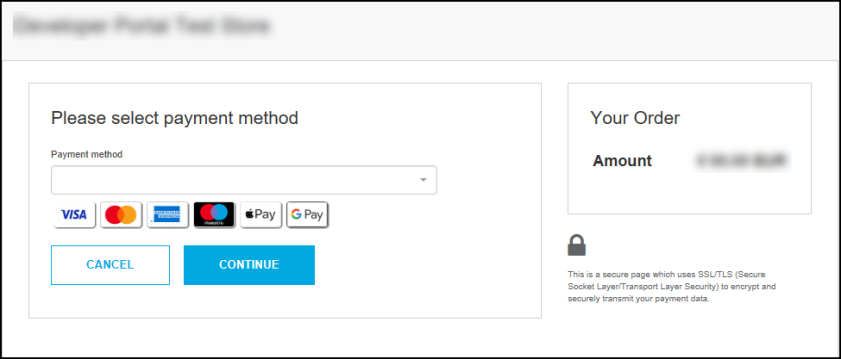
Hosted Payment Page Sample
Note: The Linkly manual entry and tokenization work we have done has only been certified for businesses that use FiServ/First Data as their Acquirer.
Getting Started (Before Working with Support)
The first step is to reach out to FiServ to obtain the appropriate API keys, branch IDs, and secret keys needed to configure the secure merchant connection to the FiServ API. You will provide this information to your ECI Support or Implementation team member so they can enable this feature for you. Also, consider the transaction timeout code (in minutes) you want them to set.
Next, choose a set of codes you want the application to use to determine when payments of this type should be processed automatically, voided automatically, and when the Cashier should review this decision.
When you process a credit card payment, there are two codes FiServ uses to validate the card data:
-
AVS codes verify that the address information supplied at Point of Sale matches that of the card owner on file.
-
CVV codes verify that the CVV (of CV2) code supplied at Point of sale matches the code associated with the card.
When the Cashier submits the payment information, the remote plug-in sends these codes to the FiServ API to validate this information against the card issuer's records. For the AVS information, the application prompts the Cashier to enter the address during the payment process for cash accounts when the address is not on file. FiServ returns two codes (one for AVS, and one for CVV) that report the search results. You can decide which of these codes the application should use to process the payment automatically, void the payment automatically, or be left to the Cashier to determine. ECI personnel enter your preferences in the Parameter fields below.
These codes are the default entries. Additional entries are not required but are recommended.

AVS Codes and CVV Codes Options in System Parameters
These are the possible AVS code results:
| Code | What does this code mean? | Should I approve this code? |
|---|---|---|
| YY | Both the street address and postal code match | Yes |
| YN | Street address matches; postal code does not match | Yes* |
| NY | Street address does not match; postal code does match | Yes* |
| YP | Street address matches; issuer did not check postal code | Yes* |
| PY | Postal code matches; issuer did not check street address | Yes* |
| NN | Neither street address nor the postal code match | Not advised |
| NP | Street address does not match; issuer did not check postal code | Not advised |
| PN | Street address not checked; postal code did not match | Not advised |
| PP | No address data provided or address not checked by the issuer | Not advised |
| XX | No address data provided or address not checked by the issuer | Not advised |
These are the possible CVV code results:
| Code | What does this code mean? | Should I approve this code? |
|---|---|---|
| M | The CVV code on the card matches the issuer's record | Yes |
| N | The CVV code on the card does not match the issuer's record | Not advised |
| P | The CVV code was not processed | Not advised |
| S | The Merchant indicated that no CVV code was present | Not advised |
| U | The Issuer is not certified and/or has not provided encryption keys | Not advised |
| X | No response from the card issuer | Not advised |
| <Blank> | No code was sent and there was no indicator that the code was not present | Not advised |
Whenever there is a mismatch, the application notifies the Cashier that the mismatch exists so they can void or process a payment based on your advice. We provide the following guidance based on the entries in the Approve this code column results:
-
Yes – Since appropriate values match, the application approves these payments automatically. This entry populates the Always Approve fields by default.
-
Yes* – Since some of these values matched and others did not, review these codes carefully to determine which ones you feel comfortable approving by default.
-
Not Advised – Most of these values did not validate. Consider whether you want to add these codes to the Always Void fields. The application processes any payment that is not on the Always Void list. Cashiers can void payments manually, based on your direction.
Note: Adding many Always Void codes could result in many unprocessed payments. Since Cashiers at the Point of Sale can void payments manually, it might make sense to train them in evaluating the circumstances with these discrepancies.
What Causes These Discrepancies in the Returned Codes?
While the payment process may occasionally fail on the issuer's side, statistics show that validating the AVS and CVV codes for credit card payments is sound. Address discrepancies can occur when the customer moves, and the address has not yet been updated in the issuer’s record. This can also happen when the address collected at the Point of Sale is incorrect. CVV codes are issued with the card, so if you are processing a MOTO payment, it could be that the customer gave you the wrong code.
What Does Reviewing a Transaction with Discrepancies Look Like?
When you process a FiServ-based Linkly transaction that has discrepancies, the application displays a message to show the Cashier the results as shown in the next figure. The payment is approved at this point but the Cashier can choose to void the payment if you are uncomfortable with the mismatch results:
AVS/CVV Mismatch Message
In this case, the CVV code did not match the issuer's record for the submitted card. Additionally, the customer’s address and postal code did not match the issuer's records. Your Cashier can choose to accept the payment by selecting the Accept button or void the payment by selecting the Void button. When the payment is voided, the Cashier can discuss other payment options with the customer.
How does the Card on File Token Work?
The application uses the Card On File feature to store a credit card token securely to the customer’s account. The token is specific to the Merchant ID and the original store ID that the token was saved to, so customers can share the token across branches (that have the same Merchant ID). You can only delete the token from the branch where the token was added originally.
What if I don’t use FiServ as my Acquirer for my Linkly Devices?
The work we have done to bring the Hosted Payment Page for manual entry and tokenization to the Linkly devices has been in partnership with FiServ, so much of the infrastructure of this feature is based on their platform. If you are not using FiServ/First Data as your Acquirer, these features will not work on your Linkly devices.
Processing Payments using the FiServ Hosted Payment Page
When the parameter and device settings are complete, you can process payments using the Hosted Payment Page. These transactions are processed locally using a remote client plug-in to ensure better security for you and your customers. You can process manual entry payments for Sales, Orders, Direct Shipments, and Return transactions. You can also use the Point of Sale > Payments process to process account payments using the Hosted Payment Page.
To process a manual entry payment using the FiServ plug-in:
1. From the Main Menu, choose Point of Sale > Sales to display the Sales Entry form.
2. From the Name field, choose the account you are processing the payment for.
3. In the data grid, enter the materials as you normally would.
4. Choose Process (F12) to display the Process Invoice Document.
5. Choose Bankcard (F2).
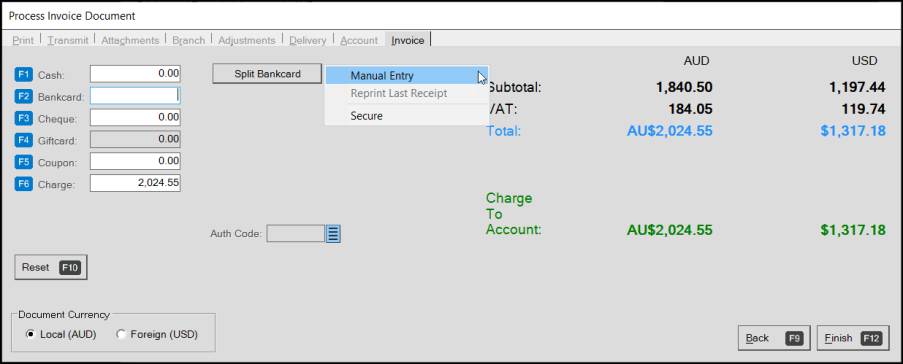
Process Invoice Document with Manual Entry Selected
6. Beside the Split Bankcard button, click the Menu Marker , and choose Manual Entry.
7. Choose Finish (12). The application displays the Hosted Payment Page.
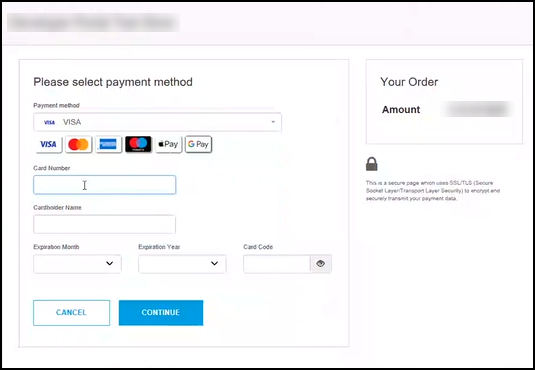
Hosted Payment Page Sample
8. From the Payment Method field, choose the customer’s payment method.
9. In the fields provided, enter the customer's card number, expiration date and CVV code and click Continue.
The AVS Information prompt displays.
![]()
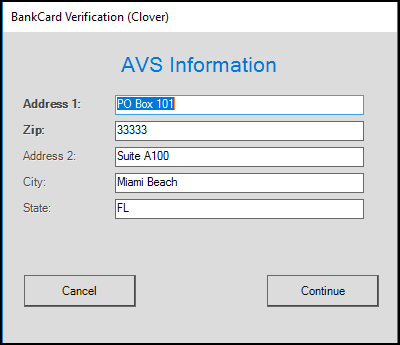
AVS Information - Bank Card Verification > Cash Account and Customer Account Prompts
10. Review or enter the address information as directed by the customer. Typically, only the street address (Address 1) and the postal code are required. If the customer asks you to change the address, type over the existing entries.
11. When you have completed these entries, choose Continue.
The application sends the information to FiServ for payment processing. Shortly, the application either displays a confirmation message or displays a mismatch message like this:
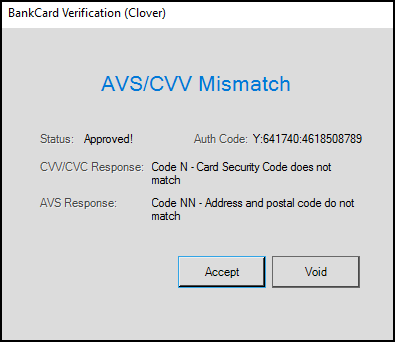
AVS / CVV Mismatch Message
12. Consider whether to process the payment and choose one of the following:
-
Choose Accept to accept the payment.
-
Choose Void to decline the payment.
If you void the payment, return to step 4 and begin the tender process again.
When you accept the payment, the application displays a prompt asking if you want to save the Card On File to the customer account.
13. Choose one of the following based on the customer's direction:
-
Choose Yes to save the Card On File token to the customer's account.
The application saves a token with some of the card details to the local account.
Important: The token is branch- and merchant ID-specific and cannot be shared with other branches. -
Choose No to prevent the application from saving this information.
14. When you have completed this selection, choose Continue to save Card on File. Then, continue based on the results:
-
When the payment process is successful, check the payment documents to ensure it reflects the transaction accurately.
-
When the payment does not process successfully, a message displays; you can retry or void the transaction.
Processing Account Payments using FiServ Manual Entry
Processing payments using the customer’s credit card may include extra amounts if you have convenience fees enabled.
To process an account payment using the FiServ manual entry payment process:
1. From the Main Menu, choose Point of Sale > Payments > Receive on Account to display the Accept Payment form.
2. From the Account Name list, choose the account that wants to pay their bill using the manual entry process.
3. In the Amount to Apply field, enter the customer’s payment amount.
4. Choose Process (F12) to process the payment. The Process Payment Document form displays.
5. Choose Bankcard (F2) to display the Menu Marker .
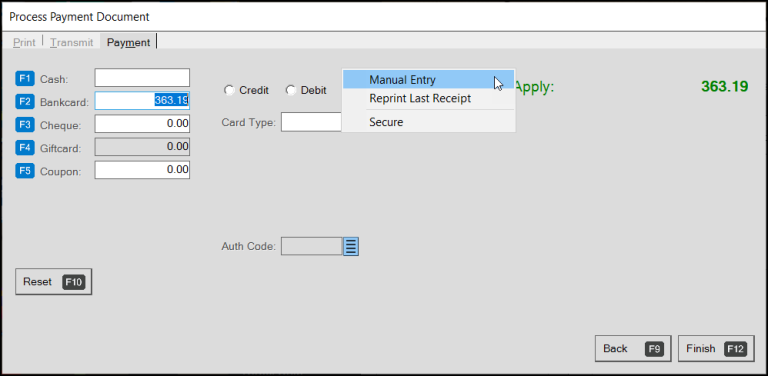
Process Payment Document > Menu Marker with Manual Entry Selected
6. Click the Menu Marker and from the list, choose Manual Entry.
7. Choose Finish (F12).
If the Cash Back prompt displays, choose No Cash Back. The Hosted Payment Page displays.
8. Enter the customer’s bankcard information (if not card on file) and choose Continue.
The AVS Information prompt displays.
AVS Information - Bank Card Verification > Customer Account Address Entered
The application prefills the address fields from the account or account / job record.
9. Review or update the address information as directed by the customer.
10. Choose Continue.
The application sends the information to FiServ for processing. Shortly, the application either displays a confirmation message or a mismatch message. Typically, the payment is approved.
11. Choose Accept. A prompt displays asking if you want to keep the Card On File connected to the customer account.
12. Choose one of the following based on the customer's direction:
-
Choose Yes to save the card on file.
-
Choose No to pay for this account payment only.
13. When you have completed your entries, choose Continue to complete the payment process.
See Also: Updates to Customer PayWare Contracts for FiServ-based Devices (Linkly/Clover)
What if something goes wrong?
If something occurs to interrupt the payment process (as when there is an issue with the application, the environment, or the Hosted Payment Page itself), when you return to the application, this message displays:
Error Message When the Payment Process is Incomplete
Click OK and then initiate the payment again. The application voids the previous invoice and bankcard charge so you can start again.
Working with Tokenized Card on File Payments
The first time a Cashier uses the manual entry process to make a Card on File payment, the application saves a token to the database tied to the customer's account to increase security. That token contains specific card information (linked to the branch ID and the merchant's account ID), which you can delete at the customer's direction at any time..
Adding a Tokenized Card on File to an Account/Job (FiServ Manual Entry Process)
You can use the Hosted Payment Page to add a tokenized Card on File in the application by following this process.
To add a tokenized Card on File to an account/job:
1. From the Main Menu, choose Point of Sale > Payments > Add Card on File to display the Accept Payment form.
2. From the Account Name field, choose the account and if it appears, choose the job number as well to which the card will be attached.
3. In the Amount field, type in 0.01.
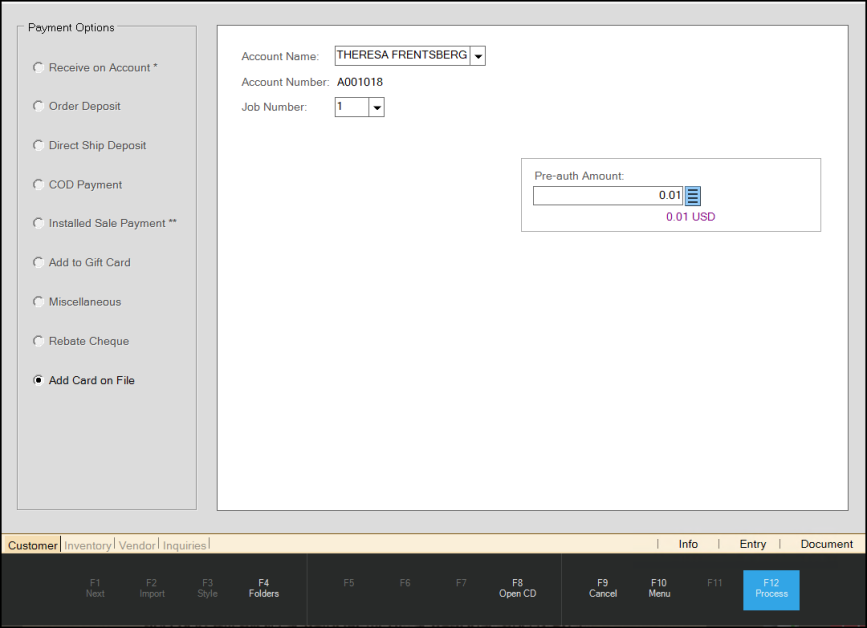
Account Payment > Add Card on File with Entries
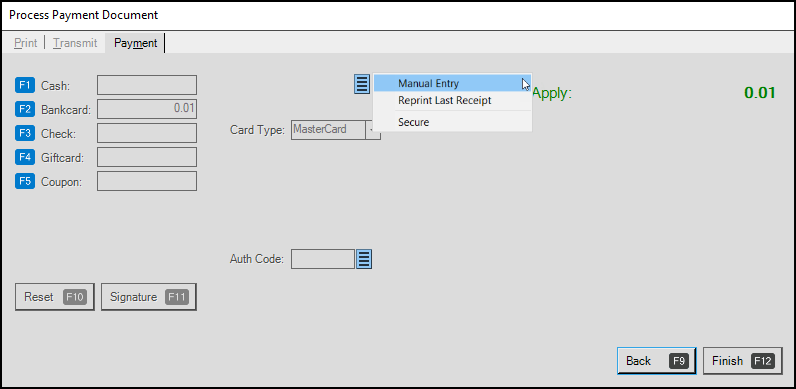
Process Payment Document with .01 Amount Charged
, and choose Manual Entry.
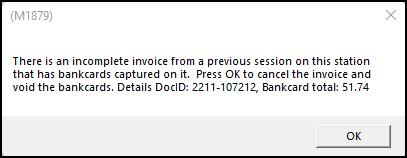
The application displays the Add Card to File confirmation message.
Checking on the Status of a Card on File Bankcard
To check on the status of the card on file setting for the account / job:
1. From the Main Menu, choose Point of Sale > Database > Account. The Account Maintenance form displays.
2. In the Account field, look up the account you added the card on file for. The account details display.
3. In the Receivables tab, choose the Bankcard(s) on file Settings ![]() button.
button.
The Bank Cards on File box displays.
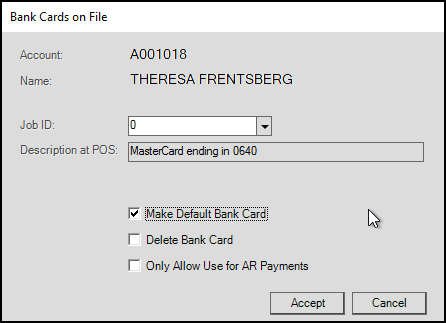
Bank Cards on File
To see the bankcard on file for another job for the same account, select the job from the list and click Accept to update the record.
Deleting or Replacing a Tokenized Card on File
You can delete the Card on File setting for an account/job in the Account Maintenance form.
You can only delete a token from the branch where the customer added the token originally.
To delete the Card On File for an account/job:
1. From the Main Menu, choose Point of Sale > Database > Account to display the Account Maintenance form.
2. From the Account field, choose the account you want to delete the Card On File from.
3. On the Receivables tab, choose the Bank Cards Settings ![]() icon to display the Bank Cards on File box.
icon to display the Bank Cards on File box.
4. If the Card On File you are deleting is specific to a particular job, choose the Job ID from the list. This step is optional.
5. Select the Delete Bank Card check box.
6. Choose Accept button to update the account.
7. Choose Process (F12) to save the changes to the account.
During the manual entry payment process, you can replace the current Card on File with a new one for an account/job by entering a new card number on the Hosted Payment Page during an account/job transaction. The system displays a confirmation message to ensure that you want to replace the existing card with the new card information:
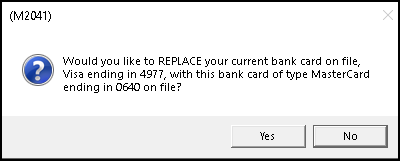
Replace Card on File Prompt
Choose Yes to replace the existing card number for this account/job.
Processing Returns for Tokenized Card on File Transactions
As customers do, you may have to process returns to the tokenized Card on File. This process works the same way as other returns do using the same process, both in Sales Entry and Charge Return areas. These returns are applied to the Card on File as you would expect. Return documents also reflect the Card on File and associated account information.