G/L Journal Inquiry
The Journal Inquiry form gives you a way to research general ledger entries. Here, you can view detailed account entries for a journal, both posted and open (not posted). The application adds journal entries daily by a scheduled process that runs between business days. System-generated entries are organized into five types: Point of Sale, Inventory, Receiving, Accounts Payable, and Accounts Receivable. In addition, you can also review manual (including recurring) journals in this form.
Accessing the General Ledger Inquiry Form
To access the Journal Inquiry form:
From the Main Menu, choose General Ledger > Inquiry > Journal.
To look at the transactions associated with a particular journal, choose the Journal ID from the list. The first four digits of the Journal ID show the Year and the Month of the journal (in this case, November of 2023). The application displays the account transactions associated with the Journal ID you chose.

Journal Inquiry Form with Entries
There are two grid areas in the form (for system-generated journals only). Manual journal types only display one grid so no additional details would apply.
The upper grid area displays the account entries that make up the selected journal. This grid lists the account number, reference, description, and the debit or credit amount of the entry. The reference for daily system journal entries contain the letters EOD (End of Day) followed by a dash (-) and the date in reverse date format (YYYYMMDD). References on manual journal entries contain a document number instead. This can be helpful for identifying the calendar date that the journal entries represent.
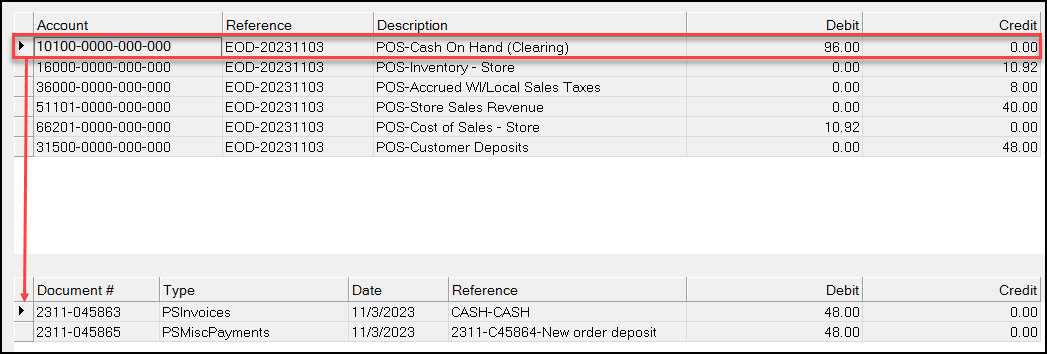
For system journals, the lower grid displays a list of documents that make up the account entry selected in the upper grid. Using the example above, when you select the Point of Sale journal for "Cash On Hand" (indicated by the ![]() arrow to the left of the row in the upper grid), the lower grid displays all the documents from that day's business that affect the "Cash On Hand" account. The lower grid lists the document ID, document type, date, reference (information varies), and debit or credit amount. The sum of the debit or credit details in the lower grid match the debit or credit amount for the selected account entry in the upper grid.
arrow to the left of the row in the upper grid), the lower grid displays all the documents from that day's business that affect the "Cash On Hand" account. The lower grid lists the document ID, document type, date, reference (information varies), and debit or credit amount. The sum of the debit or credit details in the lower grid match the debit or credit amount for the selected account entry in the upper grid.
You can also use this form to display the documents listed in the lower grid.
To view a document associated with the entry in the lower grid, double-click the Document # entry.
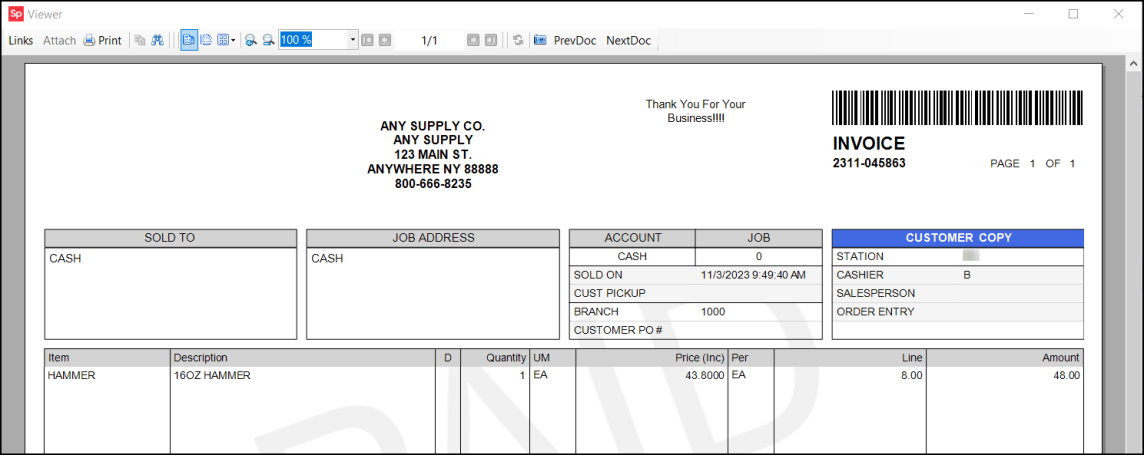
This opens the document in the Document Viewer. When viewing documents, remember that the amount of the entry isn't going to necessarily match the total of the entire transaction. For example, a single sale generates many journal entries to record changes to inventory, cost of goods sold, sales tax, income, etc. The amounts of these entries may not be immediately obvious even after viewing the document (costs of items sold won't display, for example).
Un-Posting a Journal
Posting updates account balances and creates automated entries for owner's equity and retained earnings (if necessary). Once posted, you can no longer modify the journals, unless you use the un-post process, described below to reverse the posting process. You can un-post a journal from the Journal Inquiry form as long as the cycle and fiscal year in which the journal was posted is open (not closed). After a cycle is closed (from the Close Cycle option), you can make no further entries to that cycle, so closing cycles should be done mindfully.
To un-post a journal entry:
1. In the Journal Inquiry form, choose the journal you want to un-post from the Journal ID list. The accounts associated with the journal entry display.
2. Beside the Journal ID list, click the Menu Marker  icon and choose the Un-Post Journal option.
3. When you are sure you want to complete the un-post process, choose Process (F12).
You must have administrator rights to select this option. You can undo a previously posted journal in certain cases. To display in the list, a journal must be assigned to a ledger cycle that is currently open. When you process an undo journal task, the application backs out credits and debits from the account's Actuals table and removes any entries for retained earnings and net income (unless they are the only entries in the journal).
Using the Journal Inquiry Functions
To view the next, sequential journal ID, choose the Next (F1) function key.
To clear the form of selections and leave the journal open, click the Cancel (F9) function key.
To close the form and return to the General Ledger menu, click the Exit (F10) function key.