Job Global Modify
The Job Global Modify utility allows changes to made to many jobs (and accounts) all at the same time. You can modify just the jobs for a specific customer or all jobs (all accounts). Due to this, caution should be used when performing this and any other "global" type action. There is no undo for global modifications, so be careful. Only one field setting may be modified at a time.
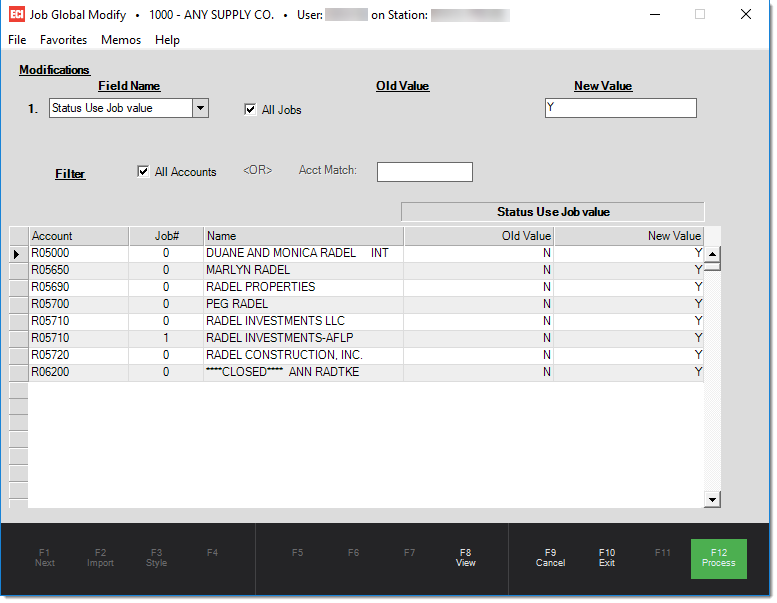
Modifying All Accounts and Jobs
•Under Filters, check the "All Accounts" option.
•Choose the field or setting you want to modify from the Field Name drop down.
•If you want to change ALL jobs regardless of the current field value, check the "All Jobs" check box; otherwise, to specify the value to be changed, clear the check box.
•If in the prior step, you cleared the check on "All Jobs" specify the specific field value you want changed.
•Enter the new field setting in the text box under New Value.
•Choose View (F8) to populate the grid with jobs meeting the criteria you specified. You may receive a warning if a large number of jobs are selected.
Note: If there are any jobs records (rows) that appear in the grid that you do NOT want to modify, you can DELETE the row or rows from the grid beforechoosing Process (F12). Rows (jobs) may be selected individually, in ranges (by holding the SHIFT key during selection), or randomly (by holding the CTRL key during selection). After selection press the DELETE button on your keyboard. Only those jobs (rows) remaining in the grid will be processed.
•If you want to proceed and change all of the jobs displayed in the grid with the settings specified, choose Process (F12). Note: there is no undo option and original settings are not retained so be careful.
Modifying all Jobs on One Account
•Under Filters, clear the check (if any) on the "All Accounts" option and enter the customer's account ID in the field Acct Match.
•Choose the field or setting you want to modify from the Field Name drop down.
•If you want to change ALL jobs for the customer regardless of the current field value, check the "All Jobs" check box; otherwise, to specify the value to be changed, clear the check box.
•If in the prior step, you cleared the check on "All Jobs" specify the specific field value you want changed. Only those jobs matching that setting will be included during grid selection.
•Enter the new field setting in the text box under New Value.
•Choose View (F8) to populate the grid with jobs for the selected account that meet the criteria you specified. You may receive a warning if a large number of jobs are selected.
Note: If there are any jobs records (rows) that appear in the grid that you do NOT want to modify, you can DELETE the row or rows from the grid beforechoosing Process (F12). Rows (jobs) may be selected individually, in ranges (by holding the SHIFT key during selection), or randomly (by holding the CTRL key during selection). After selection press the DELETE button on your keyboard. Only those jobs (rows) remaining in the grid will be processed.
•If you want to proceed and change all of the jobs displayed in the grid with the settings specified, choose Process (F12). Note: there is no undo option and original settings are not retained so be careful.
Modifying Just those Jobs and Accounts you Specify
•Do not specify any filters.
•Choose the field or setting you want to modify from the Field Name drop down.
•It is not necessary to specify any values under Old Value or New Value; however, you can if you'd prefer. The "new" value will be used as a default during grid entry. (Note: if you don't set a New Value initially, don't click in the text box for New Value after grid entry is begun.)
•Click in the grid in the first available row below the Account column. Enter or select the customer account for the job you want to modify.
•After choosing an account, either press TAB or click in the Job column and choose or enter a job number.
•After choosing a job, either press TAB or click in the New Valuecolumn and specify the value you want the field changed to. A different value may be specified for each job record you enter in the grid.
•Once you are done manually entering the accounts, jobs, and new values, and IF you want to proceed and change those jobs entered in the grid with the settings specified, choose Process (F12). Note: there is no undo option and original settings are not retained so be careful.
"Use Job Value" Type Fields
Some options contain the text "Use Job Value." On the Job Maintenance form, many settings offer a check box that determines whether the master account's setting is to be used or else the job's setting. The "Use Job Value" choices can be used to change these preferences from checked to not-checked (or the reverse).