Creating a Custom Report
Use this form to create a custom report layout that can be selected and used from the existing Balance Sheet or Income Statement report forms. Custom reports can be run by department as long as all accounts reference the base department only (usually "0000"). If specific department accounts are included on the report, selection of departments when processing the report will have no effect. There is no requirement that your custom report match the structure of the existing financial statements or provide any balance, etc. We suggest comparing any custom report to the standard reports prior to submission for accounting or tax purposes. Your company is responsible for verifying the validity of any financial statement you design for your own use.
When creating a custom report template, you are pre-defining the format or "appearance" of the report ahead of time; most options normally available when running a report (from the report forms) are disabled, such as filters, sorting, and totals options, since we assume the template is determining these properties. Custom reports cannot be scheduled or saved, so there is no automated processing; they are on-demand only.
|
Note: This feature allows you to create your own financial statement. You have total control over which accounts are included (or not), and, therefore, you determine the content and accuracy of the report. Your company is solely responsible for the financial statement's accuracy. Before submitting a financial statement to your accountant, you should compare the results to the standard financial statements run for all departments and accounts. We strongly suggest saving copies of the standard reports (with as great a level of detail as possible) as well as any custom statements you create in case there is a need to reference them at a later time and date. Additionally, we'd like to point out that creating your own financial statement should involve some pre-planning before you begin. Layout how you want your statement to appear (such as in a Word or other document) before you begin. |

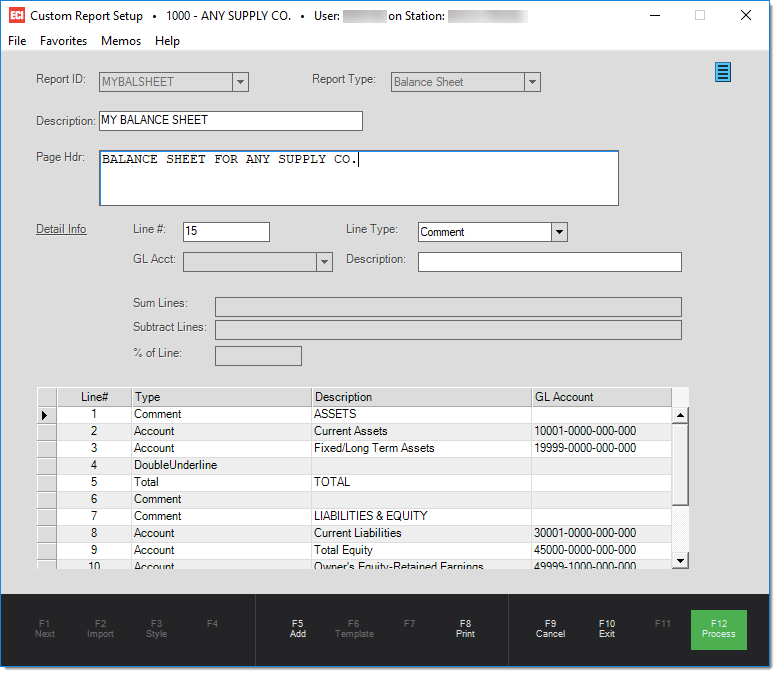
Report ID
This field has two purposes:
(1) assigning a new ID for creating a new template, or
(2) modifying an existing template.
After you begin a new custom report or modify an existing one, the "ID" field is made read-only. You must either Cancel (F9) or Process (F12) to make changes to another report. To rename an existing report, create a new report with the name you want, use the template option to copy the existing report, and choose Process (F12) to save your changes. Make sure you can modify the new report and that it includes all of the information. If this is the case, cancel and then select the original report and delete it using the Menu Marker ![]() on this form. There is no "undo" if you accidentally delete the wrong report, so please be careful.
on this form. There is no "undo" if you accidentally delete the wrong report, so please be careful.
Report Type
We offer two report types: Balance Sheet and Income Statement (also referred to as a "P&L" or profit and loss statement). Choose the one you are creating a template for. This determines availability of the template for selection either from the Balance Sheet or Income Statement report forms in the application.
Description
This text-area provides an area for a short description of the template. This is printed or displayed near the top of the report pages.
Page Hdr (Header)
This text-area may be used to indicate text for printing near the top of each page below the description.
Detail InfoThe detail info section is used for indicating various elements used for creating a report: accounts, accumulators, comments, totals, page breaks, underline, and double-underlines. Use the Save (F5) function to add a line to the report. When the Save (F5) function is used, the current detail will be added to the grid unless it already exists (in which case, it will be updated). Please Note: the Save (F5) function does not save the custom report. You must choose Process (F12) to save a custom report. Line # This numeric value indicates the order of the line in relation to the details printed on the report. The lines should be numbered beginning with one (1) and sequentially thereafter. The line number determines the order of how the element is listed on the report. Line Type This selection indicates the type of line that will be printed. Choices include: account, accumulators, comment, total, page break, underline, and double-underline. Requirements of the remaining selections are set based upon your selection here. The page break, underline, and double-underline are formatting options only and don't require any additional information. •Account - Any posting or summary account in your ledger. Header type accounts are used for descriptive reasons only and don't print totals. Group and Title type accounts provide summary totals for the accounts they own. Posting accounts print their balance. If you are defining totals, be careful not to include summary accounts and the accounts they summarize more than once in the same totals or you may inflate or deflate your figures. If your account structure includes a department code, and you add only accounts with the base department ("0000"), those accounts will provide a summary of the department accounts on the report. If any accounts reference specific departments, not just the "0000" base department, the "0000" department, if included, won't provide a summary. •Accumulator - This is the same as a total except that the lines you sum or subtract are suppressed (not shown) when the financial statement is generated. Lines can be be of any type; however, an accumulator cannot total or suppress itself. •Comment - This prints a comment line. •Total - This provides a figure that is the sum of the "sum" lines less the sum of the "subtract" lines. •Page Break - This marks the end of a page. Any later content (lines) will be printed beginning with the next page. •Underline - Provides a single underline for any columns containing account balances or totals. •Double-underline - Provides a double underline for any columns containing account balances or totals. Often this is used for a grand or ending total (a total comprised of other totals). GL Acct For the "account" type detail, you select an account from the listing of your chart of accounts. Header, Group, and Title type accounts already provide a summary of the accounts they own, so you wouldn't want to include a "summary" account along with the accounts that are summarized (totaled) by that same account (unless you specifically exclude one or the other from your totals definitions). "Header" type accounts are treated as comments if included, and won't print totals. Groups, Titles, and Posting accounts will provide totals or summaries (group and titles summarize other "posting" accounts assigned to them as their owner). Should any "account" records not have an account specified, they will be ignored. Description This text-area provides the ability to provide comment text (used for headings, etc.) or to change the description for account detail entries. This is not necessary for breaks or underline elements. Sum Lines This area is provided for indicating the detail lines, by number, that should be summed for a total. This field is only enabled when a total line type is being added. Line numbers can be entered separated by either commas or dashes (-). Dashes indicate a sequential range of numbers. For example, "1-5" includes lines 1, 2, 3, 4, and 5. Line numbers that are not sequential should be entered separated by commas. For example, add lines 23, 24, and 32, you would enter the following: 23,24,32 Regardless of how you enter the lines, series of sequential lines with more than two (2) members will display with a dash, and others will be separated by commas. Subtract Lines This area is provided for indicating the detail lines, by number, that should be removed (subtracted) from the total. This field is only enabled when a total line type is being added. For example, to subtract lines 45, 46, and 60, you would enter the following: 45,46,60 % of Line This is only used for when creating a template for use with an Income Statement, not the Balance Sheet. If you indicate a line number here, a percentage is calculated and shown on an income statement that is the percentage of the line's balance or total compared with whatever line is designated in the text-area. This field is only enabled when a total, accumulator, or account line type is being added. To display 100%, enter the current line number. Percentages aren't required. |
Inserting, Modifying, and Removing Detail Lines
To add a new detail line at a location somewhere other than the end of the current list of details, choose "Insert" from the data grid's alternate menu (usually a right-click) from the row below the row location you want to insert.
To remove one or more rows, highlight the rows and either press the Delete key or choose "delete" from the data grid's alternate menu. Use caution when deleting rows, there is no undo (unless you've previously saved (processed) the template in which case, you can choose Cancel (F9) and then reselect the saved template).
To modify an existing row, save your current detail if needed and then click the row header cell to select the row (the blocks along the far left-hand column of the data grid). The details panel should populate with that row's information. Please note: clicking within a cell of a row in the data grid won't select the row. Visually check the row number in the edit area with the row you selected to ensure that you are actually editing the row you want to modify.
Functions
The following functions are offered with this utility:
Save/Modify (F5)
This function is used to either save a new detail line or make changes to an existing line. It's important to select either save or modify prior to choosing Process (F12) if any changes to a detail line have been made without previously doing so.
Template (F6)
This function can be used to copy the format from an existing custom report to a new report. When modifying an existing (previously saved) report, the Template (F6) function is not enabled in order to prevent accidentally overwriting your existing report/work. To use this option, begin creating a new report by assigning a new identifier. Next, choose the Import (F6) option, and select the custom report you want to copy. Once copied, make changes, and choose Process (F12) to save the report. This can make creating custom financial statements much easier when variations or changes are needed. It can also be used for testing new changes before making changes to your "original" report.
Print (F8)
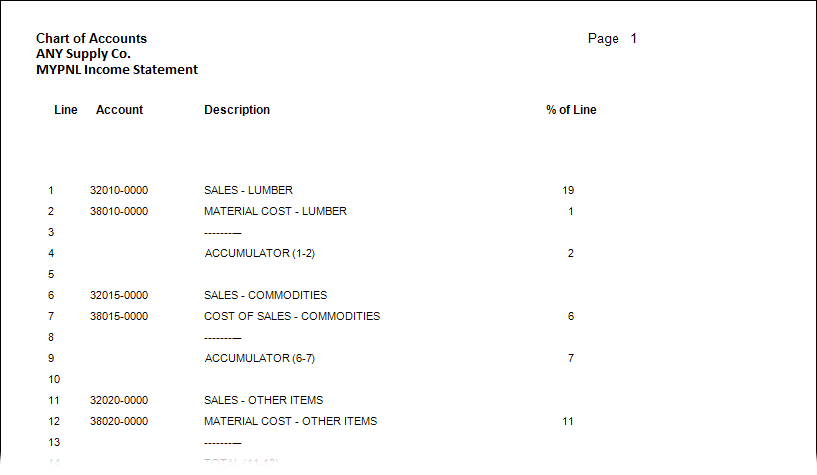
A print function is provided so that users can review on screen or paper the structure of their custom financial report. This function is only enabled after selection of an existing report template. It's important to save any changes, using the Process (F12) function, prior to using this function to ensure that the latest changes are included. The "saved" structure of the report is used, not the current state of the report in this form. Once you choose Print (F8), the most recently saved version of the current report is displayed in the viewer where it may be printed or saved to a file using the "print" button. Descriptions for accumulators and totals are not printed; however, the lines they sum or subtract are listed in parentheses next to the element's type name.

Process (F12)
To save or update your custom report, you must choose Process (F12) prior to closing the form. Only details that appear in the data grid area will be saved. If you make any additions or changes to an existing detail, choose Modify (F5) before choosing Process (F12).
Running the Template
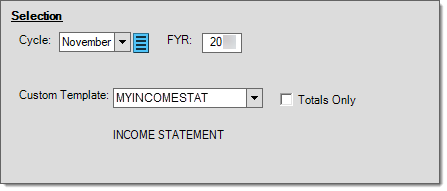
Custom report can be viewed or printed from either the Balance Sheet or Income Statement report forms. These forms offer a "custom template" drop down in the "Selection" panel where you can choose a template. The Select (F5), Save (F6), and Schedule (F7) functions are disabled when used with a custom template. These reports can be run on-demand only. Filters are enabled when running custom reports and the option to run the report "totals only" is provided in the Selection panel (the usual totals panel on the report form is disabled when running a custom report).
