Chart of Accounts
A "chart of accounts" is your company's list of accounts used for producing financial statements. Accounts are organized into standard accounting types such as assets, liabilities, income, expenses, cost of sales, and so on. Each type has an assigned numeric range that is determined by the Parameters for General Ledger (found on the Maintenance > Database menu).
To access the chart of accounts, from the Main Menu, choose General Ledger > Database > Chart of Accounts. The Account Maintenance form displays.

Accounts (Chart of Accounts) Maintenance
Category
There four (4) different categories of accounts: header, group, title, and posting. These categories determine whether the account either: (1) maintains a balance or (2) is used for totals. Header, group, and title accounts do not maintain balances but are important for determining how accounts are summarized and represented on financial statements.
Type
The account type refers to the class of account such as assets, liabilities, expenses, and so on. Each class has a particular use. Assets usually represent what your company owns and liabilities record what your company owes, for example. Income is generally used to record revenue (money your company collects) and expenses are used to record the money your company spends to operate. Cost of Goods sold is a type of expense that is used for recording the cost of inventory your company sells or uses. Other types include other income, other expenses, and provision for taxes.
Owner
The "owner" of an account is another account that is used for summary totals for the account. Owners are not allowed to carry a balance, they are only used for providing totals (header, group, and title types). The owner should be the same class of account (asset, liability, etc.) as the account being added. Ideally, the numeric order of accounts should be maintained so that owner accounts are lower numerically than the accounts that they summarize. Header accounts do not have an owner.
Description
The description is a free text area which is used for describing the account. The database size limit on the description is 1024-characters; however, financial statements and other areas don't necessarily display the full description length if used.
Disable for Posting
It's possible to disable a ledger account. Disabling accounts prevents them from being added to new mapping and doesn't allow grid selection in the Journal Entry area. Financial Statements and other General Ledger reporting still include disabled accounts (depending upon the type of account and level of summary) as would inquiries. Accounts can be re-enabled at any time.
Disabling does not affect the account's balances in any way, it's just a function to prevent the account from being mapped or added to journals. This really only applies to account types capable of maintaining a balance (posting accounts, not headers, groups, etc.). The software checks system, recurring journals, detailed mapping, and open journal entries for the account prior to disabling. If the account is mapped or used in open journal entries, the software produces a error message preventing the account from being disabled.
Balance & Cycle Information
Some balance information is shown for reference when viewing a balance-bearing (posting) account. Some account types (header, group, and title) do not hold balances and therefore will not show any figures when selected (they are used for producing totals on financial statements). A few abbreviations are used for labeling balances: PYR means "prior year balance," FYR means "Fiscal Year," and "PMth" means "prior month."
The "current cycle" is the same cycle for all accounts. Current is not the current date's ledger cycle. Current cycle is the oldest open cycle (this cycle would be the oldest cycle that allows posting new or existing account entries).
|
Ledger Cycles The fiscal year has thirteen (13) cycles. Each month of the year is assigned a cycle and one additional cycle is provided for making year end adjustments. This is referred to as the "adjustment" cycle (13) and is always the last cycle of the fiscal year. Your financial (fiscal) year might be calendar based or it might be different. If your fiscal year is calendar based, the cycle #1 would be January and cycle #12 would be December; however, if not, the first month of your fiscal year would be cycle #1 and the last month of your fiscal year would then be cycle #12. Cycles must be closed manually. Before closing a cycle, all open entries for that cycle must be posted first. Closing the last cycle of the fiscal year, closes the year financially and should only be done after any adjustment entries have been made and posted --and-- preliminary financial statements reviewed by your accountant in case changes are needed. There is no undo if you close a cycle accidentally, so use caution! |
Understanding Account Organization
Think of each category as a different level. The top most level is the header account. For example, the first asset account entered will be a header named "assets." This will typically use the lowest account number defined for that range (or type) of account. The next level below header is group. Financial statements can be run as a group summary to get a basic financial picture without too much detail. Title accounts are the lowest level account that do not hold a balance. These accounts provide a more detailed break down within the group level. Posting accounts are the only type that holds a balance and can be placed in the chart of account hierarchy below either a group or title type.
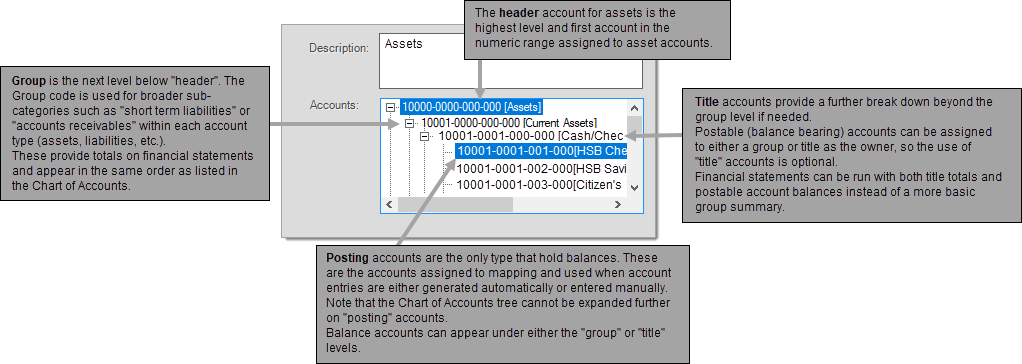
Each account has an owner. The owner of an account determines the totaling account that is used for reporting that account's balance on financial statements. Groups total into headers, titles total into groups, and posting accounts can total into either a group or a title depending upon how they are set up. The owner of an account is either a header, group, or title. Posting accounts cannot be used as an owner of another account. In addition, only group accounts are allowed to have a "header" as an owner. Posting accounts can be assigned to either a group or title account as an owner.
Setting up a New Chart of Accounts
Begin by planning/reviewing your company's chart of accounts on paper. Account numbering is flexible as several different formats are available; however, it is likely that some adjustments to account numbers will be necessary when setting up the new chart of accounts. It's important to plan this out before beginning entry. This is also an ideal opportunity to re-work your existing chart of accounts if your company isn't happy with it.
It's a good idea to decide upon a numbering scheme to be used with each category before beginning (assets, liabilities, etc.). Number ranges are flexible because financial statements use the "type" assigned to the account not the number to determine where that account belongs. It still makes sense, however, to keep accounts for each particular type in specific numeric ranges. One way to do this is to begin each account number within a type using the same digit. For example, all asset accounts might begin with the number 0, liabilities with 1, owner's equity a 2, and so on.
There are two (2) special account types that are used for owners equity (aka. retained earnings) and net income. In your previous chart of accounts, these may have been represented by accounts located under the liabilities or income categories. These are separate account types in the software. These accounts don't appear in system journal mapping, but do need to be mapped under detailed mapping.
Multiple Branches
The second set of numbers in an account number is referred to as the department. Specific departments can be used to designate a branch location. If your company has multiple locations (branches), branch offsets can be defined to make detail and system mapping for each branch automatic. Offsets are defined from the General Ledger tab on the Parameters database form located under Maintenance, Database. Usually, offsets are round number increments such as 1000 or 100, etc. These are used to determine which accounts in the Chart of Accounts should be used when a particular branch is involved.
Tips on Adding New Accounts
Either enter the new account number manually or select an existing account number close to the one you want to add then change the number in the Account # input area.
To help maintain organization, try to keep new accounts in a logical order. Maintain the numeric ranges established for each account type.
Rather than numbering accounts sequentially, use increments (10, 100, 1,000, etc.). Different increments can be used with each level. For example, a Header might be increments of 10,000 only, Groups increments of 1000, Titles increments of 1000, and Posting accounts increments of 10. This allows you flexibility if you will need to insert a Header, Group, Title, or Posting account between existing accounts at a later time. See the examples below:
50000-0000-000-000 (Header)
51000-0000-000-000 (Group)
51100-0000-000-000 (Title)
51110-0000-000-000 (Posting)
51120-0000-000-000 (Posting)
51200-0000-000-000 (Title)
51210-0000-000-000 (Posting)
51220-0000-000-000 (Posting)
52000-0000-000-000 (Group)
52100-0000-000-000 (Title)
52110-0000-000-000 (Posting)
52120-0000-000-000 (Posting)
52200-0000-000-000 (Title)
52210-0000-000-000 (Posting)
52220-0000-000-000 (Posting)
60000-0000-000-000 (Header)
61000-0000-000-000 (Group)
61100-0000-000-000 (Title)
61110-0000-000-000 (Posting)
61120-0000-000-000 (Posting)
Consider the owner of accounts when determining the account number to be used (ideally, a new account should be placed numerically after its owner in the list of accounts, but prior to the next group or title account used by other accounts as an owner).
To complete the entry of a new account (or changes to an existing account), press or select the Process (F12) function.
Adding an Attachment to a GL Account
If you need to, you can add an attachment to an account record. You might want to add a Windows File (spreadsheet, PDF, etc.), a map link (for a property or inventory location, etc.) , or an account document. You can restrict who has permissions to view theses attachments.
To add an attachment to a GL account:
1. In the Account Maintenance form, from the Account # list, choose the account you want to add the attachment to.
2. In the Attachments box, place your cursor in the Reference field and type a description of the attachment. More attachment fields display.
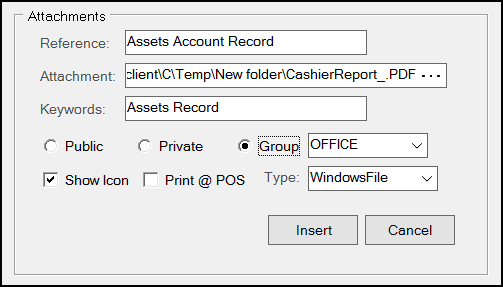
3. From the Type list, choose the type of attachment you are adding to the GL account. Options include Windows File, Map Link, Web Address, and Document.
Depending upon what you are attaching to the account, from the do one of the following:
-
If you are adding a Windows file, click the Browse ... icon in the Attachments field and navigate to the folder that contains the information you want to attach to the GL account. Choose the file from the list and click Open.
-
If you are adding a website or map link to the account record, paste the link into the Attachments field.
-
If you are attaching a document stored in the application, the Attachments field updates to be a Doc # list. Find the document you want to attach to the GL account and select it.
4. In the Keywords field, enter keywords that can help someone find this attachment later. This is not available for all attachment types.
5. Choose the audience that is allowed to review this attachment as follows:
-
To allow all users to view this attachment, choose Public.
-
To reserve this attachment only to the current user, choose Private.
-
To allow a group of users with the same access rights to view this attachment, choose the Group button and choose the group ID from the list.
6. Select the Show Icon check box to display the icon associated with this attachment. This is not required.
7. Select the Print @ POS check box to print this attachment as part of the Point of Sale documentation when this account is used. This is not required.
8. When you have completed these settings choose Insert to add the attachment.
Note: If you are changing the attachment, this button is Update instead.
9. Choose Process (F12) to save the attachment to the database.