Attachment Search Utility
You can store your
These document archives can contain a wide range of current and historical information including customer account, GL, item, and inventory data. In addition to providing the documents to be stored, the database can manage data associated with the documents to make search easier and more efficient. Data permission information should also be provided when the data is imported to ensure that the public and private settings are observed based on a user’s or a user group’s permissions.
Business owners can work with Support team members to help you set up this feature.
Setting up User/Group Permissions for Attachment Search
Work with the ECI Support team to verify that the Attachment Search Utility set up is complete. These permissions should be set up for each user who needs access to the Attachment Search Utility.
To enable users to use the Attachment Search Utility:
1. From the Main Menu, choose Maintenance > Database > User IDs to display the User ID Maintenance form.
2. From the User ID list, choose the user or user group that requires access to the Attachment Search feature.
The User ID Maintenance form updates to display the record details.
3. In the Security Options tab, next to the Permissions List, click the Settings ![]() icon to display the Permissions List Code Maintenance dialog box.
icon to display the Permissions List Code Maintenance dialog box.
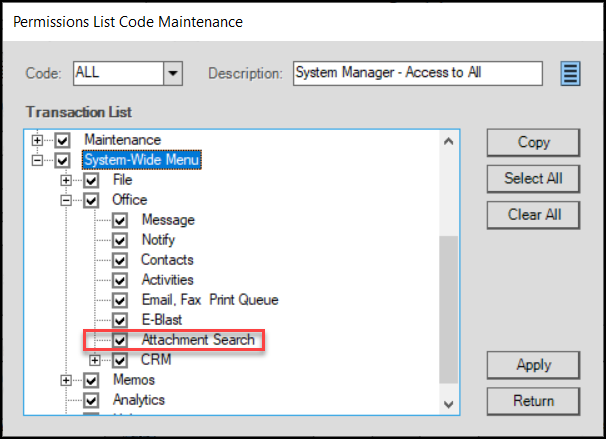
Permissions List Code Maintenance > Attachment Search Option Highlighted
4. From the Transaction List, choose System-Wide Menu > Office and click the Attachment Search menu item to add a check mark.
5. Click Apply to set this permission for the selected user(s) and choose Return. The User ID Maintenance form redisplays.
6. Click Process (F12) to save the changes.
After these permissions and options are set, users with permissions will see the Attachment Search menu item in the Office menu. Users without this permission will not.
Setting up the Remote Client for Local Attachment Viewing
Complete these steps for each station that will use the Attachment Search Utility. Before you get started, make sure the ECI Support team has completed the set up for the Attachment Search Utility and verify that the Attachment settings are completed for the user. If the user already has Remote Client set up on this station, you can just check to ensure that Remote Client is enabled.
Note: From time to time, the Remote Client pairing process changes. We recommend you work with Support if issues occur.
To set up a Remote Client station to view attachments using the Attachment Search Utility:
1. Log into the Corporate Hosting environment.
2. From the Main Menu, choose Maintenance > Database > Devices. The Device Maintenance form displays. The Station option is selected by default.
3. In the Device Name field, select the device (station ID) of the user that will use the Attachment Search Utility.
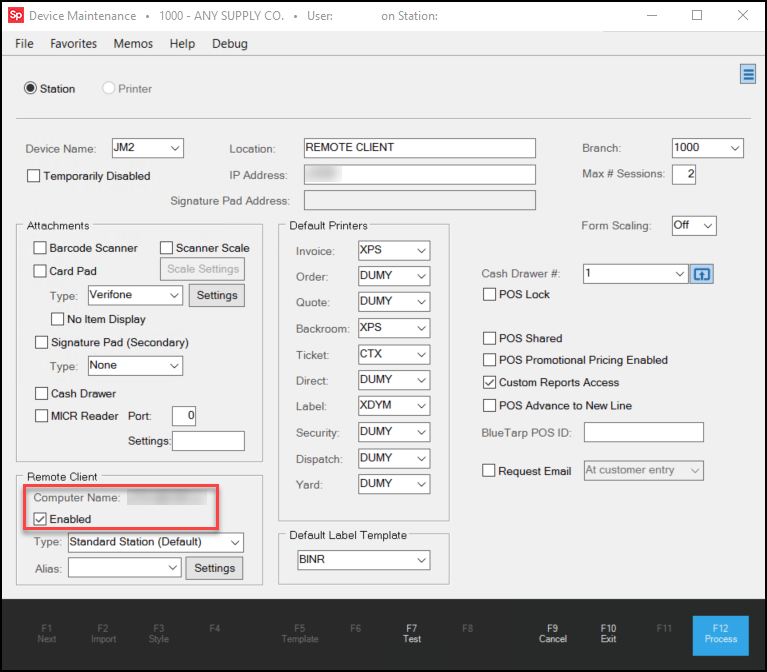
Device Maintenance Form – Remote Client Enabled
4. Check the station values at the top of this form to ensure that the value in the IP Address field is set to the user's corporate Windows User ID or IP Address (as advised by Support team).
5. In the Remote Client section, select the Enabled check box.
6. Click Process (F12) to save the changes. A PIN code displays.
7. Give the PIN to the user to pair with the remote client.
8. Install the Remote Client on the user's device. The Remote Client Utility dialog box displays.
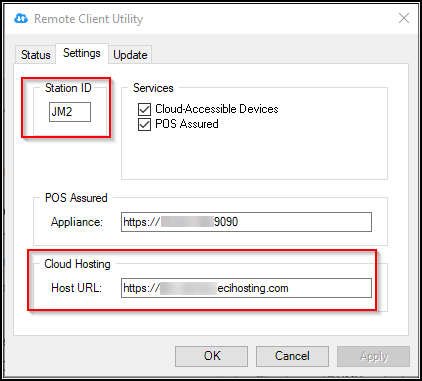
Remote Client Utility – Settings Tab
9. In the Settings tab, enter the user’s station ID in the Station ID field and enter the Cloud Hosting URL in the Host URL field.
10. Click OK to save these changes. The PIN prompt displays.
11. Enter the PIN number generated in Step 6 and click Accept. The station pairs with the Remote Client.
12. Choose Apply in the Remote Client Utility.
Using the Attachment Search Utility
When setup is complete, authorized users can perform the search from anywhere in the system. If you are connecting remotely, follow the instructions for setting up the Remote Client before following these instructions.
To find and display a saved attachment using the Attachment Search Utility:
1. From the Tool Bar, choose Office > Attachment Search. The Attachment Search Utility form displays.
2. In the Search field, enter the text you want to search for. This can be a customer’s name, an attachment type, an account name or number, an Item Number, a vendor name, etc. An entry in this field is required. Consider using these tools to narrow your search:
-
To search for documents that contain a single word, type the word in the Search field
-
To search for documents that contain two different words, type the first word, type the word AND (in capital letters), and type the second word
-
To search for documents that contain one word or another word, type the first word, type the word OR (in capital letters), and type the second word
-
To search for a document within a date range, enter the earlier date in the Starting Date field and the later date in the Ending Date field.
The Starting Date must be earlier than the Ending Date and both dates must be valid, or an error message displays. Future dates are not valid.
Date entries are optional.
3. When you have entered your search criteria, choose Process (F12). Documents that match the search criteria display in the data grid.
If no documents match the criteria you entered, a “No matching selections found” message displays.
When there are valid matches, the following information pertaining to the found documents displays:
-
ID
The documents identification code in the archive. -
Attachment Reference
The reference information associated with the document. -
Attachment Name
The name assigned to the attachment document. -
Insert Date
The date the document was added to the archive. -
File Size
The size of the document in KB.
4. Click an entry in the first grid to display document details in the second grid.
Note: You can also right-click the grid and choose Select All (or click <Ctrl A>) to display all results in the second grid.
-
Attachment Type
Indicates the type of document in the list, such as Document, Item, Account, GL Account, etc. -
Document ID
Shows the ID code associated with the document. -
Account
Account name associated with the document selected, if applicable. -
Job
Job name associated with the document selected, if applicable. -
Item Number
Item number associated with the document, if applicable -
Vendor
Vendor associated with the document, if applicable. -
GL Account
GL account number associated with the document.
5. To open a document in the second data grid:
-
Click the row once to highlight it and click View (F7), or
-
To open more than one document at a time, click each document you want to open in the grid and click View (F7).
Note: If you select five documents or more to open at once, a message displays warning that opening the selected attachments may result in adverse system performance.
6. After you choose an option, a processing message displays to show you the progress toward opening the document. You can click Cancel to stop the document opening process. One of the following conditions occur:
-
If the document you selected is not found, a message displays explaining this.
-
If the document(s) you selected can be opened using an available application, such as Notepad or Acrobat, the document(s) display.
-
If a program cannot be found to open the document, a pop up message displays. To continue opening the document click Yes. To stop, click No.
7. If you are searching for an application to display the document, Windows prompts you to select a program (based on applications on your device) that you can use to display the document. When one of the applications works for you, choose the application and click OK. The document(s) display.
Updating an Attachment using the Remote Client
Remote Client users who are authorized to do so can open an attachment file locally, modify it, and then save the updated version of the document back into the database. Remote Client installation and setup must be completed before these steps are taken. Typically, we anticipate that this feature will be used to update Item attachments.
To update an attachment document and save it back to the database:
1. From the Main Menu, choose Inventory > Database > Item to display the Item Maintenance form.
2. Select the item record you want to change the attachment for from the database.
3. From the Common tab, click the Attachments subtab.
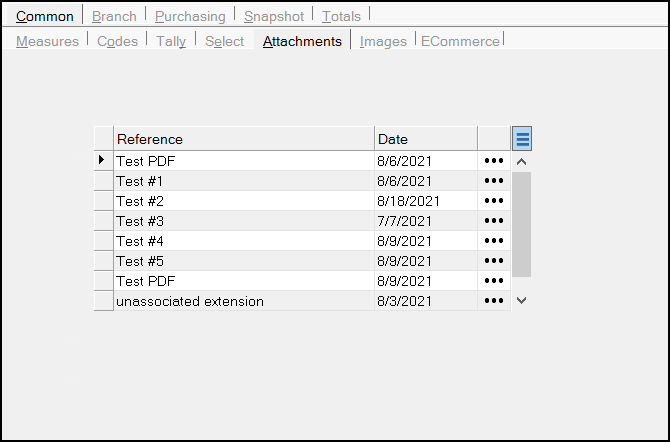
Item Maintenance > Common > Attachments
4. Review the attachments in the Reference column and click the one you want to change.
5. In the Save In column for the selected attachment, click the Ellipsis  button to display the reference details.
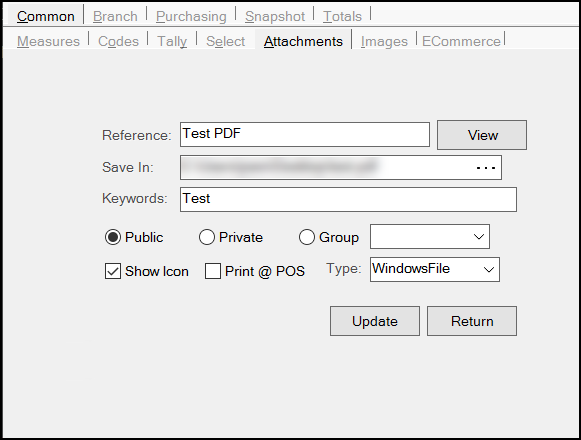
Item Maintenance > Common > Attachments Detail
6. Click the View button to display the document.
7. Make your changes to the document, but do not save the changes locally yet.
8. Click Return to display the Item Maintenance Attachments form (above) and update the Keywords field with any additional keywords that will help you and your colleagues find this document in the future.
9. When the document is ready to save, click the Ellipsis button again and click Update to update the record.
10. Click Return to return to the Item Maintenance form.
11. Choose Process (F12) to save the updated document to the database.