AnyWare Purchase Order Entry
You can use the AnyWare Purchase Order Entry feature to create or modify an existing mobile Purchase Order. You cannot access a mobile purchase order document immediately and mobile purchase orders do not affect the on-order quantities for items until the mobile purchase order is associated with a Spruce purchase order (and if the Mark as ordered check box is checked).
You can import mobile purchase orders into the application by choosing Purchasing > Order Entry > and the selecting the Import (F2) option and selecting the Mobile Purchase Order option.
Note: You cannot import purchase orders into AnyWare that contain non-stocked items, including Special Order items, Manufactured items, and Hardwood items.
Creating a Mobile Purchase Order
You begin to create a mobile purchase order by assigning a unique identifier to the purchase order.
This might be a user name or some other convention your company decides upon. The identifier is temporary and will be removed once the mobile purchase order is processed in the application.
For a new "mobile" order, type in the desired identifier ("MYPO," for example), and then long-press on the "Order #" control. The app displays a menu with New and Vendor Code options.

To create a new mobile purchase order with the assigned identifier, select New.
(To select an existing mobile purchase order, you would select Vendor Code and select the existing mobile purchase order. The order would already have to have a vendor code assigned to make this work.)
Next, you select a vendor. You can make a default selection by typing the vendor's code in the text area and using a short press to produce a selection listing. A long-press on the Vendor Code control offers an alternate selection option using the vendor's name instead.
After you have a mobile order # (identifier) and vendor, you are ready to add or modify the items to the mobile purchase order. To access the item fields, use the > arrow button near the top of the form.
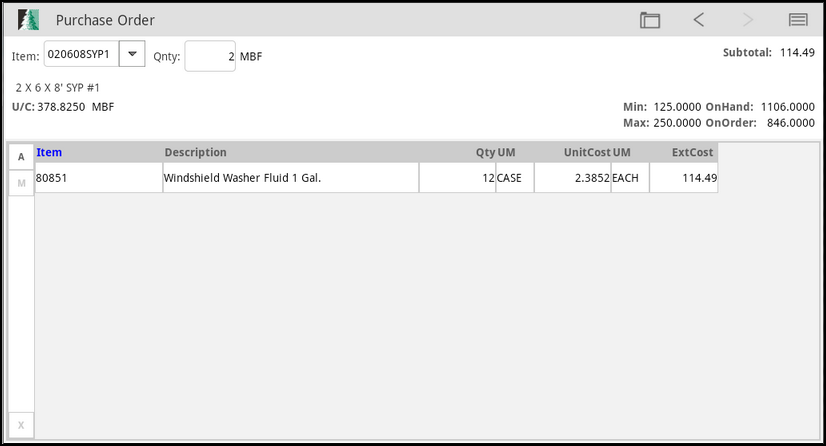
Item Entry Data Grid
You scan or select items using the item control. After the item appears in the list, you can specify the quantity the customer wants.
The upper area of the form displays the item's description, current unit (last receipt) cost, minimum/maximum quantities, on-hand, and on-order.
A subtotal for all the items currently associated with the mobile purchase order displays near the upper left corner of the form.
Selecting an Item
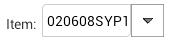
You can scan an item's UPC (barcode) or you can type in some or all of the item's SKU in the Item Text area to narrow the search.
If you have a Motorola Enterprise ET1 tablet with a bolt on scanner, you can use the paddle buttons on the back of the device to activate the scanner. You can also use other supported wireless BlueTooth™ scanners. If your Android device has a camera with the necessary software, you can use the Scan option from the Menu. In all these cases, the cursor or active field must be the Item control.

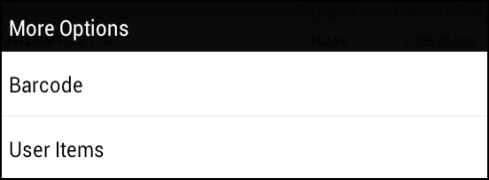
Alternate selection options include barcode and user items.
You can also use alternate selection options such as the Barcode and User Items. To see more options, in the Items text field, enter a full or partial barcode and long press on the item control until the "More Options" menu appears.
-
Choose Barcode from the list and the matching items (if any) display.
It is far easier to use your device's bolt-on scanner or a wireless handheld scanner than this method. -
Choose User Items to display a list of items that are linked to a specific user.
These items can be defined in the Spruceapplication and are often short lists of commonly needed or used items. Partial entries in the Item text area before choosing the alternate menu can help narrow down the results returned.
To add new items to the grid, choose the A button or long press on the grid control and choose Add from the menu.
To save changes to an item you previously selected from the grid, press the M button or long press on the grid control and choose Modify from the menu.
To delete an item from the list, choose the X button or long press on the grid to see a Delete option on the menu. For additional information about the data grid, please click here.
Managing Items in the Data Grid
The data grid is usually linked with item entry, and provides a listing of the items currently associated with the transaction. The data grid provides options for adding new items, selection (modification), and deletion.
Minimally, a data grid is going to list items by SKU (item number) along with a description and other pertinent information such as quantities, units of measure, and extended amounts. The exact information presented in the data grid will vary based on the type of transaction; for example, a purchase order would display cost information whereas a customer order or mobile invoice would involve pricing. The controls provided for item entry can also vary in this regard since some "entry" fields will only apply to certain types of transactions and not others.
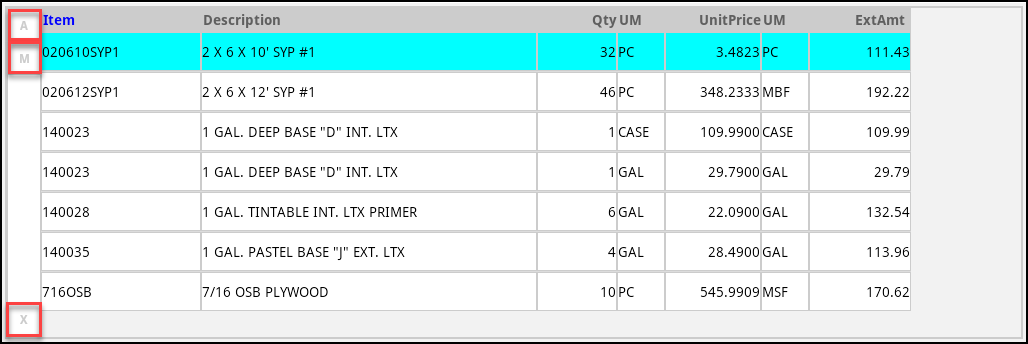
Data Grid with Items
Along the left side of the data grid, you can find these buttons to perform these actions:
-
Add (A),
-
Modify (M), and
-
Delete (X)
To change an existing item in the data grid, choose the row with the item information. It displays in the upper area of the form.
Selecting a row in the grid displays the item information in the upper area of the form. Then, you can either (1) make changes and then choose (M) to modify and return the item to the grid or (2) choose delete (X) which removes the row (item) from the grid and the transaction.
As an alternative to using these buttons, you can also long press in the grid area. Doing this produces a menu offering the same add, modify, and delete options that the buttons provide. The long press may work better on smaller display screens (if you have difficulty pressing the appropriate buttons).
Depending upon your device's display size and number of items, some of the grid columns and/or rows may be hidden from view. You can scroll the grid control up and down and right and left to view additional details. Scrolling is done by using a swiping action on your touch display.
Processing a Mobile Purchase Order
When you have added all of the required items to the purchase order, you are ready to process it.
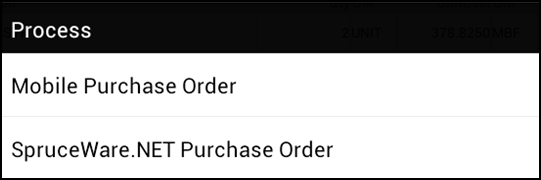
You have may have two process options:
Mobile Purchase Order
Select the Mobile Purchase Order option if you think other AnyWare users need to modify the order. A mobile purchase order is still available for Import into the application later. After the Mobile Purchase Order is imported into the application, it is no longer be available to AnyWare users. Application users can import the manual purchase order You can import mobile purchase orders into the application by choosing Purchasing > Order Entry > and the selecting the Import (F2) option and selecting the Mobile Purchase Order option.
Application Purchase Order
If the SpruceWare.NET Purchase Order option is available, you can save the current order as a "live" purchase order document.
When this process is complete, AnyWare users will no longer have access to the purchase order and it will immediately be available to application users.
Note: The Purchase Order option is not offered if Rebate Tracking has been enabled for your application (Maintenance > Database > Parameters > Purchase Orders tab). There is no coding in the AnyWare app to support rebate handling at this time. The application can still import a mobile purchase order even if rebate tracking is enabled, however.