AnyWare Item Maintenance
You can use this feature to add some very basic file maintenance information for items in your company's inventory. Changes you make here immediately update the item inventory records both in AnyWare and in Spruce. You can update the item's minimum and maximum quantities, which are used for purchasing. You can also use this feature to update the item's location codes.
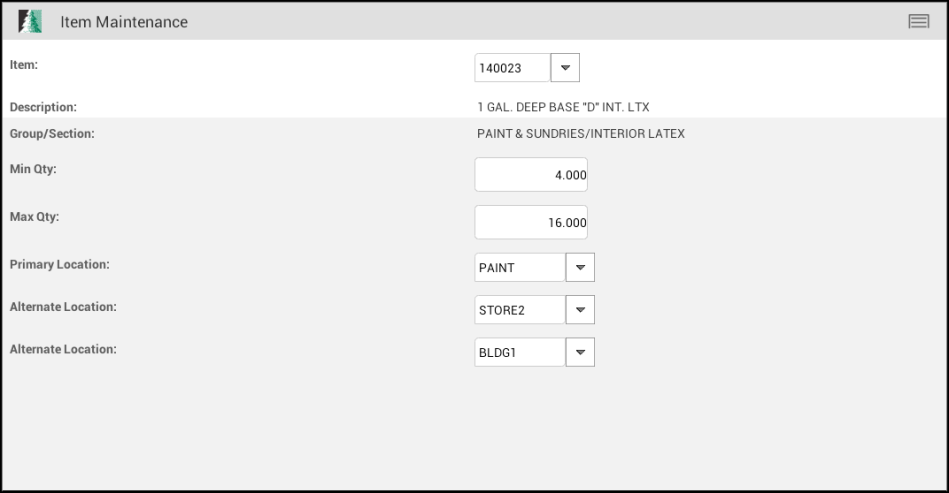
Item Maintenance
Selecting an Item
You can scan an item's UPC (barcode) or you can type in some or all of the item's SKU in the Item Text area to narrow the search.
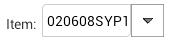
If you have a Motorola Enterprise ET1 tablet with a bolt on scanner, you can use the paddle buttons on the back of the device to activate the scanner. You can also use other supported wireless BlueTooth™ scanners. If your Android device has a camera with the necessary software, you can use the Scan option from the Menu. In all these cases, the cursor or active field must be the Item control.

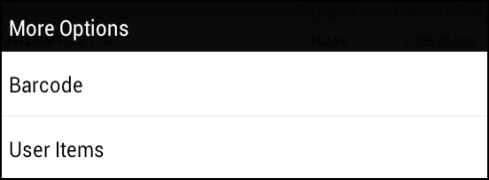
Alternate selection options include barcode and user items.
You can also use alternate selection options such as the Barcode and User Items. To see more options, in the Items text field, enter a full or partial barcode and long press on the item control until the "More Options" menu appears.
-
Choose Barcode from the list and the matching items (if any) display.
It is far easier to use your device's bolt-on scanner or a wireless handheld scanner than this method. -
Choose User Items to display a list of items that are linked to a specific user.
These items can be defined in the Spruce software and are often short lists of commonly needed or used items. Partial entries in the Item text area before choosing the alternate menu can help narrow down the results returned.
Description
After you select the item, the item's short (32-character) description is shown. Longer descriptions are truncated.
Group/Section
This entry displays the group and section text descriptions for the selected item. Groups and sections are used for inventory organization and are numbered. A company can have between 1 and 255 groups and each group can have between 1 and 255 sections within the group. Groups and sections have text descriptions associated with them which are shown here.
Min Qty
The application uses an item's minimum quantity (Min Qty) for purchasing and is intended to be the re-order point for the item. When the available (on-hand less committed) quantity of the item drops below the item's minimum, the item should be reordered. Minimum quantity is always represented using the item's BASE unit of measure. In the application, the minimum quantity can be set to be re-calculated based on the lead time or a percentage of the maximum. Changes to an item's minimum (or maximum) quantities using automated methods are only applied if the Adjustments transaction is used to update them (via the Purchasing menu). Changes made here only affect the current minimum quantity for the item and don't alter any automated adjustment settings in the application.
Max Qty
The maximum quantity (Max Qty) is also used for purchasing and is intended to be the desired stock (shelf) quantity for the item when fully stocked. When automated purchase calculations are done, the maximum quantity is one of the factors used to determine the quantity to order. Maximum quantity is always represented using the item's BASE unit of measure. In the application, an "automatic" adjustment option is offered to calculate a maximum based on usage and the number of days supply or usage interval specified for the item. This "System Automatic Adjustment" requires the use of the Adjustments activity under Purchasing to initiate the calculation of new maximum quantities. Changes made here only affect the current maximum quantity for the item and don't alter any automated adjustment settings in the application.
Primary and Alternate Locations
Using these selection controls, including the alternate locations, you can set the location(s) assigned to the item. Each location involves a code (with a corresponding description) which would need to be previously defined using the application. Locations codes are used to indicate where an item is located in the store, yard, or warehouse, for example. Some companies determine a scheme that represent a building, aisle, and bin/shelf, for example. In other cases, the location might be more generic or less specific. Organization and use of location codes is up to your company's management.
To change from an existing location, you must clear the text area first and then enter the location or short press on the selection button to provide a full or partial selection list of defined location codes.
Note: Warehouse (SpruceWMS) enabled items do not permit changes to locations from this transaction or from the software since quantities can be associated with locations in those cases.
Processing
Once all items have been entered, choose Process from the Menu to save your changes.
A confirmation message appears after changes have been saved. To clear your current entry without saving changes, choose Cancel from the menu. To return to the previous menu and leave this transaction, use your device's Back button.