ACE In-Store Pickup (ISPU)
ACE In-Store Pickup (ISPU) is available to any dealer approved by ACE to run the program. This document presents an overview of the program’s use within the application with suggestions for best practices.
Setup
1.You must first be approved by ACE to participate in the ISPU program. The first step will be to log in to ACENET and fill out their online application. This can be done through copying and pasting the following link in your brower: https://acenet.aceservices.com/help/AceWayOfRetailing/Pages/Processing%20an%20Acehardware.com%20In-Store%20Pickup%20Order.aspx#task1 .'
2.Once you agree to the terms and receive approval, some setup will be required (for example who should receive new ISPU order alerts.)
3.Before you enable the ISPU process, a key step will be to confirm that your ACE item quantities on-hand are accurate. If they are not, ACE, your ISPU customer, and your store will all have bad experiences. Suggestions include:
a.Regular cycle counts
b.Annual full inventory counts
c.Defined procedures that prevent quantity issues relating from damage, inventory store transfers, returns, store resets, etc.
d.The use of ACE EDI for purchasing
e.Stock alert notifications and periodic use of the Inventory Alerts report
4.Set up a General Ledger (GL) account to maintain visibility on funds due in from ACE for ISPU sales. For example, you could add a new current asset with a description of “ACE ISPU Funds Due.”
5.Set up new Credit and Debit adjustment options to the above GL account through GL Detailed Mapping.
6.Since your payment from ACE will be delayed, we recommend that you set up a receivables account specifically for In-Store Pickup sales transactions or, if you have multiple ACE locations, a separate account for each location. This will allow you to track what payments (credits) are outstanding from ACE at the branch level. The following are suggested settings; you can accept the default value for fields not specifically noted here. These settings are found under Receivables > Database > Account.w
Receivables tab:
•Account Number: it’s probably best to keep this either above or below all your normal account numbers so you can exclude the account for reports when desired. In addition, if you have multiple branch locations, you may want to include the location code as part of this for easier reconciliation. For example, if you normally use a person’s 10-digit phone number for their account number, you could use “9999999999” or “9999999999-1000” as the account number, or you could use letters if that would be outside your normal range (“ISPU” or “ISPU-1000”, for example).
•Name: We suggest “ACE In-Store Pickup” as the account name. Include the branch if you have multiple branches (i.e. “ACE In-Store Pickup – Br 1000”).
•Sort Name: Precede the default “ACE In-Store Pickup” Sort Name with a lower-case “z” followed by an underscore (i.e. “z_ACE In-Store Pickup”) to have the account show up last on reports and selection lists sorted by name.
•Class: You may want to define a class outside your normal class range so you can exclude the account from reports sorted by customer class.
•Price Level: 0 – Store Retail
•Account Type: Charge
•Posting Type: Open Item
•Billing Level: Account
•Statement Type: Consolidated (No Summary or Remit)
•Print Zero Statement: No
•Reprint Invoices: No
•Credit Limit: this should be high enough to cover your maximum outstanding ISPU balance at any time, including during peak seasons. For example, if you don’t anticipate amounts due from ACE to exceed $10,000 but you may see amounts approaching it in peak seasons, you can set the credit limit to $10,000. Note that this could always be adjusted if the limit is exceeded, so you may want to be conservative.
•Statement Delivery: Assuming you don’t wish to print the ISPU account statement by default, we recommend checking the “Email” delivery option.
oGo to the “Contacts” tab and add your company’s email address to the “Contact 0” contact, making sure to click on F6 (Modify) to save the change; this will allow you to send statements via email to your own account.
•Discount: 0 (zero)
•Finance Charge: 0 (zero)
•Terms: 120+ Days
Codes tab:
•Tax Location: your store's default location
•Sale Prices: N
•Override: Store Mgr Password (this will alert you if your credit limit on the account is exceeded during an ISPU transaction at Point of Sale).
•POS Branch: If you have multiple branches, you can set this to a specific branch and set up a separate ISPU account for each branch to prevent users from using the wrong ISPU account for their branch. This will make for easier reconciliation and application of ACE credits.
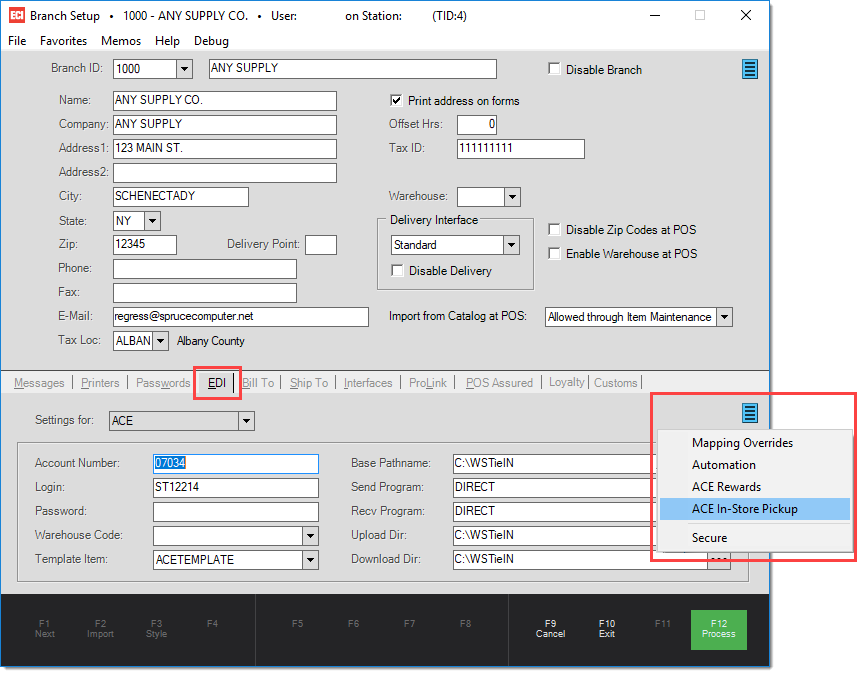
7.To enable hourly ISPU data feeds, from the system main menu, go to Maintenance > Database > Branches and pick the branch for which you wish to enable the process. On the EDI tab, pick the ACE vendor code, then click on the blue menu markerand select "ACE In-Store Pickup.”
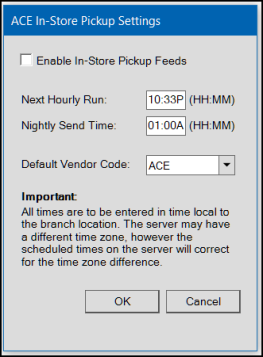
8.From the "ACE In-Store Pickup Settings" dialog window, select your ACE vendor code and check the “Enable In-Store Pickup Feeds” option. We recommend that you accept the default Hourly Run and Nightly Send times.
Note that if you save these settings and “POS Data Send” is not already enabled through the “Automation” option, the system will automatically enable POS Data Send because it is required for In-Store Pickup.
9.Sign up for email and/or text alerts for new orders ACE receives for your store via the acehardware.com site.
10.After 24 hours, confirm with ACE that they are receiving hourly inventory quantity on hand data.
New ISPU Orders
When you receive a new order through the ACE website, you will want to follow a process that assures you will be able to care for the customer pickup while tracking the order properly. Suggested steps:
1.Sign into the ISPU system and print the Pick Ticket and the Hold Ticket.
2.Pull the item(s) from your shelf and place them in a designated area where ISPU orders are staged.
3.Generate an order transaction using the information on the ACE documents. Apply an Accounts Receivable charge (to the ISPU account) to the order for a 100% deposit.
a.For ease of later reconciliation, we recommend entering the acehardware.com web order number in the “Customer PO#” field on the Account tab of the Process Form.
4.Physically attach the order document to the purchased item(s) in your ISPU staging area.
5.When the customer arrives to pick the item(s) up:
a.Ask for the order confirmation they received via email. It is your responsibility to verify the customer’s identity.
b.Invoice the customer order (or, if the customer is only picking up part of the order, invoice the portion being picked up) and give the resulting invoice document to the customer. The order deposit will apply against the invoice, so no amount will be due from the customer.
c.As quickly as possible after the customer pickup, close the order on the In-Store Pickup website. This assures that you will receive a credit for the transaction from ACE.
6.If the customer refuses to pick the items up:
a.Return the deposit to the AR account through POS Payouts
b.Close or Void the customer order
c.Return the item(s) to the shelf
d.Use the ACE order cancellation process on the ISPU website. The acehardware.com site will process a credit to the customer’s card.
Receiving Credits on Your ACE Statement
Credits on your ACE statement labeled ACEHARDWARE.COM CREDIT represent funding for prior ISPU sales that were completed or partially completed. To reconcile:
1.Click on the “Ace Invoice Number” hotlink on the statement to open a PDF of the credit.
2.Compare the Web Order Number on the ACE statement with the Customer PO# within Accounts Receivable to identify the correct invoice.
3.Record an A/R credit adjustment on the store’s ACE ISPU account and apply it against the invoice you’ve identified. The GL selection should be the new account you set up for tracking funds due.