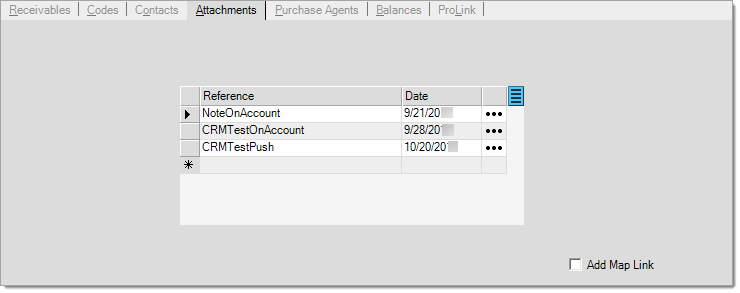
The Attachments tab contains any attachments that are associated with an account (you may also associate attachments with other record types such as jobs, items, and vendors). An attachment can be any Windows compatible file, web site (URL), document, or map link (URL). Some ideas for account-based attachments include: credit applications, tax exempt forms, purchase orders, job site photos, correspondence, links to the account's web site, and job site directions.
How does the Application maintain Attachments?
We save the attachments you add to accounts and other records in the application's SQL database and also in an entirely separate database that is specifically dedicated to file-based attachment data. The application does not store Windows File type attachments locally or save them to disk, but saves them as "image" data in the separate Attachment's SQL database. This separate database is linked with an Attachments table in the application's database with the other information about the attachments (permissions, print settings, type, original path name, etc.). Attachments that are not Windows Files, such as map links and application documents, do not need to be added to the separate database because no external file data is associated with them.
Attachment Settings
You can make some choices when you add or modify attachments, but your ability to make these additions or changes may be limited by your user security settings in the User ID Maintenance form.
When you start typing a reference description in the Attachments tab's Reference field, new fields and options display.
")
Attachments (Insert) before Entries
Note: When you modify an existing attachment, the Insert button changes to Update.
")
Attachments (Insert) with Entries
For a step-by-step walk-through on adding new attachments, please see the topic Attachments Step-By-Step. Modifying an existing attachment is relatively easy. To do so, you select the attachment from the Attachments tab, make your changes and then click the Update button.

Attachment (Update) with Changes
Although not always required, it is a good idea to choose Process (F12) after making additions or changes to the Attachments tab. This ensures that you save the Attachment changes to the account record.
Reference Field Entry
Use the Reference field to describe the attachment. Since Reference entries are used to identify an attachment, they should be unique. When using a "drag and drop" method to add attachments, the reference defaults to the file name and extension of a file based attachment. If the same reference already exists, a message window will ask you whether or not you want to associate the existing attachment with the document instead of creating a new one.
Reviewing the Attachment and Doc #
Attachment is the current path name (directory location) of the file on the user's computer or the URL address of the map link or a web site. For file based attachments, a copy of the attachment file will be made in a database table that is maintained by the server. Files are not kept individually, they are saved as image data within a SQL table. URL addresses are saved as text.
When you choose a Type of "Document, the Attachment field label updates to Doc #, which is a different control for selecting documents.
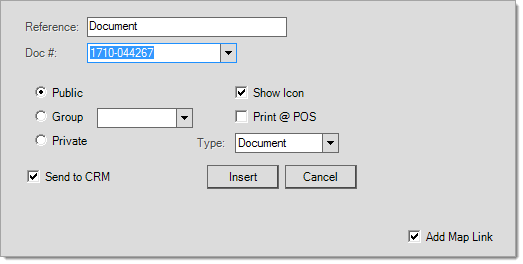
Understanding the Access Permissions (Private, Public, and Group)
When adding a new attachment, users may choose to make the attachment public, private, or assign it to a user group. This choice affects whether or not the attachment will be visible to a particular user.
•Public attachments display as part of the account record and can be selected and viewed by all users.
•Private attachments display for the current user if they are the user who saved the attachment only.
•Group attachments display for members of the assigned user group. User Groups are defined from the Messages form (Office menu).
The ability to add, modify, and delete attachments may be restricted by general user security as well as by the status of the particular attachment (Private, Public, or Group). Some types of attachments, such as those associated with a record (account, vendor, or item), can only be added, modified, and deleted from a database form (including the Attachment Maintenance form), not from within a transaction. In this case, no Browse option is shown and users will be unable to modify path names or save a new attachment. This does not restrict access to view or print record based attachments necessarily; however, that may be limited as well. Contact the System Administrator at your company for questions regarding your security permissions.
Understanding the File Types
You can choose a Windows File, a map link, web site address, or document as the file type using the drop down list:
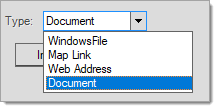
Windows File
"WindowsFile" refers to any Microsoft® Windows®-compatible file type. Usually, these types of files require some other software that may or may not be provided with your Microsoft Windows operating system. These types of attachments are stored in a separate SQL database and table as "image" data, not as individual files in a directory. The same attachment may be used with many different records.
Map Link
"MapLink" refers to a URL (web site address) that initiates a third-party mapping service search for a specific address using your default browser. Users may use this site to generate a map to a specific address then click on "link to this page" to create a link address which may then be copied and used as an attachment to a document. Internet access and browser software are required. We are unable to guarantee the accuracy or availability of any third party mapping service. Also, please see the Add Map Link section below.
Web Address
"WebAddress" refers to a normal web site address (URL) which you can type in or copy from a web browser's address bar. The web site addresses (URL) must be manually entered or copied into the Attachment text box.
Document
Document refers to an application generated document ID. This allows you to enter/select any document ID and save it as an attachment. No data is saved with this attachment, just the document's internal identifier (DocIDInternal) .
Show Icon
The Show Icon check box defaults to Yes (checked) and determines whether or not the attachment icon displays at point of Sale, in Inventory, or in the Vendor Maintenance form for the selected attachment. Standard icons include:
-
 (for Document attachments), or
 -
 (for Account, Job, or Vendor attachments), or
 -
 (for Item attachments)
These icons display when a particular attachment is present. When multiple attachments are present, if any of the attachments are set to Show Icon, the appropriate icon will display.
Print @ POS
Use this check box to set whether a Sales person can print a particular attachment from the Attachments tab on a transaction's Process (F12) form at Point of Sale. It does not cause an attachment to automatically print during processing. In addition, this setting does not prevent a user from being able to open and subsequently print any attachments listed on the Info or Entry folders during a Point of Sale transaction. The permissions (public, group, or private) on the attachment are really the only thing that can potentially block access to an attachment.
As stated, even with this setting enabled, printing attachments remains a somewhat manual process. On process forms with an "attachment" tab, you can select one or more attachments and then click the Print button. Only those attachments designated as "Print @ POS" are included.
Add Map Link
You can use the Add Map Link check box to add a map link type attachment that builds the URL request based upon the current account or job address (no automated map link is provided for vendors). Any maps may be optionally displayed in your default browser and require Internet access. The availability and accuracy of any third-party mapping service is not guaranteed.

Add Map Link
Modifying Attachments
To modify an existing attachment in the Attachments tab:
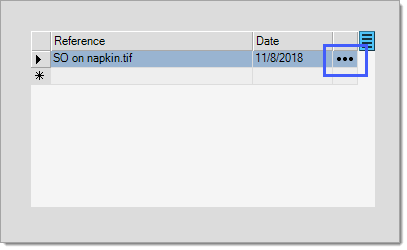
1. In the Attachments tab, click the Ellipsis (...) button beside the attachment you want to modify.
2. Make any changes to the attachments record and click the Update button (or click Return to cancel the change).
3. Choose Process (F12) after making any changes to save the changes to the account.
Removing Attachments
You can delete Attachments by deleting the attachment row from the grid, if you have these user permissions. To do this, click the row by selecting the cell to of the row then press the Delete key or right-click the row and choose the Delete option from the context menu. Another way to remove record based attachments is to use the Attachment Maintenance utility located under the Maintenance area.