VeriFone Wireless e285 Credit Card Device
Card processing with Global Payments® is handled mostly by this handheld device itself. Card information is never displayed in the software and is not available until after the card transaction has completed. Processing a bank card payment will look significantly different from other bank card features when Global Payments is enabled and the station has a pad assigned. For general information about Global Payments implementation, see the topic VeriFone Global Payments.
Use this hand-held device to process credit, debit, EMV/chip cards, gift cards, Apple Pay, Android Pay, Samsung Pay, Level Up, and for signature capture (without a pen). It features a full color display. This device can connect using Wi-Fi and is compatible with other Windows devices.
To learn more about setting up the VeriFone e285, see this set up topic or this Quick Start Guide topic on the Global Payments Support site.

Obtaining the IP Address and Configuring the Wi-Fi Settings for the e285
Before you get started, use the instructions below to find the IP address and configure the wi-fi connection of the e285 device you are setting up. Make sure your remote client utility is set up correctly for the station that you are adding the device to. These instructions are required for all ECI products. Be sure to connect the e285 device to the same network as your application.
To find the IP address on the e285 device and configure the wi-fi connection:
1. On the device’s keypad, press the numbers 1, 5, and 9 simultaneously.
2. Tap Supervisor and enter the wi-fi configuration password, 1166832. Press Enter.
3. Tap Administration > Communications > WiFi and then tap WiFi Scan.
If the device’s WiFi is turned off, the device prompts you to turn it on.
4. Tap the network you want to connect to.
When the connection is successful, a confirmation message displays.
5. Tap OK and then Cancel.
6. Tap WiFi Configuration. The WiFi Configuration fields display.
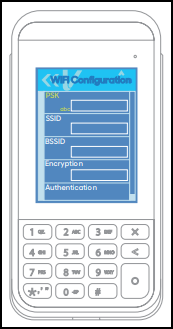
7. In the PSK field, type the network’s password.
Note: To switch between lower case and upper case letters and numbers, tap #.
8. Press the Cancel button to return to the WiFi menu.
9. Tap WiFi Interface IPv4 to display the IP fields.
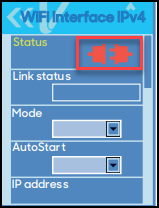
WiFi Interface IPv4 List with Connection Icon Highlighted
10. From the Mode list, choose DHCP.
11. From the AutoStart list, choose On.
12. Complete the entries in the following fields, based on the device settings and the network requirements:
-
IP Address, Broadcast, Mask, Gateway, DNS 1, and DNS 2
13. When you have completed these settings, in the Status field, tap the Connection icon to connect the device to the network.
The Link Status field Connection icon updates to Connected when this is successful.
14. Tap Cancel four times to return to the Main Menu.
15. In the Main Menu, swipe up and tap Run Applications.
16. To test the network connection, tap Options > Network.
17. Tap Options > Connection Test. The Connection Test list results display. The test results display with the IP Address.
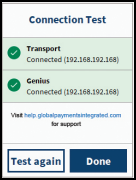
Make a note of the device’s IP address.
18. Tap Done to close the list.
Configuring the e285 in the Application
After you have the IP address, follow the instructions below to complete the configuration in the software. You need to complete these steps for each device/station.
1. Log into the application with your administrative permissions.
2. From the Main Menu, choose Maintenance > Database > Devices. The Device Maintenance form displays.
3. From the Device Name list, choose the station you are setting the device up for.
4. In the Attachments section, choose the Card Pad check box and from the Type list choose Cayan. The Cayan Device Settings pops up.
Note: If you are changing settings, click the Settings button instead.
5. From the Device Type list, choose Genius E285.
6. In the IP Address field, enter the IP address you found in the instructions above.
Leave the Port setting as it is.
7. Consider your Status timeout value and either accept the 60-second default or enter your own value.
8. Select the Enable Manual Refund if you would like to offer that option, or uncheck this check box if you would prefer not to.

Device Maintenance > Cayan Device Settings with e285 Options Entered
9. When these settings are complete, click Accept. The Device Maintenance form redisplays.
10. Choose Process (F12) to save the e285 settings to the station.
Repeat this process for each station that will use an e285 device.