Statement Delivery & Processing

It's important to understand that billing customers occurs in two (2) stages. In the first stage (or step), you create the statement documents. This occurs automatically between business days and is typically scheduled to happen on the same date each month. In the second step you schedule the delivery of those statements to your customers. Delivery is user-initiated, not automatic. The Statements form located under the Receivables activity is used for delivering statements. We are using the term, "delivery," to mean printing (for mailing), faxing, or emailing statement documents for your customers.

How and When are Statements Created?

Statements are documents created between business days by a scheduled task. Although statement documents are added to the library by this process, they are not delivered (printed, emailed, or faxed) automatically. User involvement is required to email, fax, or print any statements.

An "AR" checklist (Accounts Receivable) is scheduled to occur on a monthly basis, usually on the same day each month (the 25th, 1st, etc.). The checklist ages account balances, assesses finance charges, and produces statement documents. Upon request, finance charge assessment can optionally be done on a different (earlier) date in advance of other billing processing. Typically, the process is scheduled for the early morning (AM). In this case, the previous day's date is used for the statement documents.

Statements are formatted using the account settings in place at the time the monthly scheduled AR task is done. Later changes to customer settings won't retroactively affect any past statement documents. A customer's statement delivery choices can be modified before statements are delivered (printed, faxed, or emailed) but this doesn't affect the actual content of the document.

Every customer's monthly statement is created as a separate document in the library, and past statements remain available for future reference.

Delivering Statements by Mail, Fax, or Email

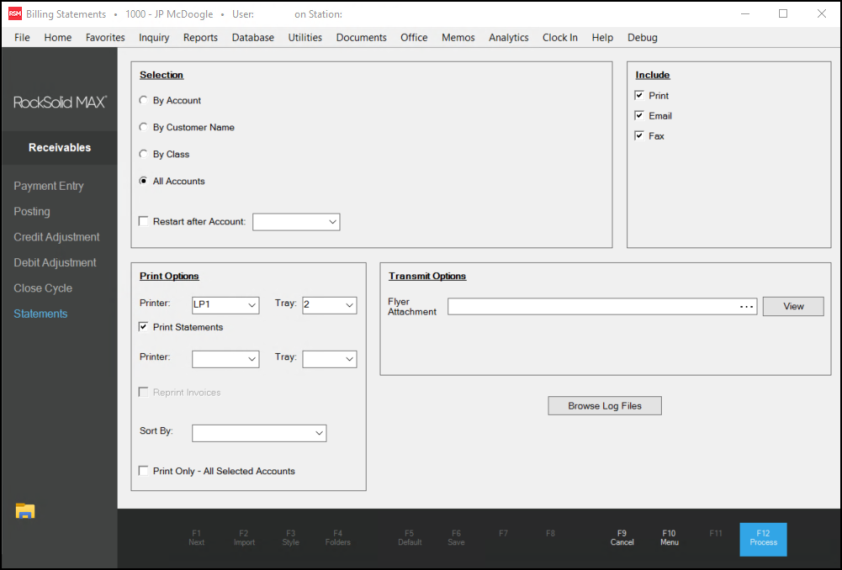
The Statements form, located in the Receivables area, is used for delivery of statements to your customers. This form allows selection based upon the customer's assigned delivery methods ("print" for mailing as well as email and/or fax for electronic delivery), the specification of ranges and other selection criteria, and the choice of reprinting invoices when applicable.

To make processing more efficient, we suggest that you limit each customer to one delivery method; however, there is no enforced restriction and multiple delivery methods are possible. The same account options (regarding statements) are applied to all delivery selections equally. For example, it is not possible to email and fax a customer's statement document, but only email (and not fax) their invoices.

Delivery by either fax or email is dependent upon external processing that must be configured, managed, and monitored independently from the software. Any configuration is the responsibility of the customer. Emailing requires a dependable SMTP (Simple Mail Transfer Protocol) server. Faxing requires that the Microsoft Fax Server be installed on the server. For more information about Faxing, please see the topic Fax Setup & Use. For information regarding email, see the topic Email, Fax & Print Queue.

The Statement form can only be used for delivery of the most recent statement period. Prior documents are available individually from the Documents form, however. Statements are available for delivery only after the statement documents have been generated by the scheduled task (AR).

Filtering Statements by Branch

When your business has more than one location or you run more than one company, you may want to organize statements by different criteria than we have traditionally provided. We added a way to group statements by the account’s AR Branch and/or Report Branch settings in Account Maintenance form to generate statements. This change gives you a way to organize your statements without creating additional work and ensures that no statements are left out. This feature is for charge accounts only. This feature works for both Spruce and RockSolid MAX applications.

After you set a system parameter, the application looks at entries in the Branch Setup form:

  • Receivables Tab > AR Branch, and

  • Codes Tab > Report Branch

You can set these options to group statements by the branch the customer uses or perhaps, the branch you associate with a particular company. After you set the new parameter, a new section displays in the Billing Statements form, so you can choose Branch-specific settings when creating Billing Statements.

Billing Statements Form with Account Report Branch Settings

Using the branch-specific check boxes, you can generate account statements according to the account settings in the Report Branch list.

OR

Using the Account AR Branch/Branch list option, you can generate the account statements based on the account’s AR Branch setting.

Further, you can use the Billing Statements form find accounts that do not have branch settings so you can update them.

We thought having these two options would be useful for businesses with multiple branches that roll up into different companies or where multiple locations roll up into a single corporation, but you keep the finances separate.

Setting the Branch Statement Filter Parameter

After you set this parameter, the AR Branch and/or Report Branch settings will be required in the Account Maintenance form and the new branch setting options display in the Billing Statements form. You must have administrative privileges to set this parameter.

To set the branch filter parameter:

1. From the Main Menu, choose the Maintenance > Database > Parameters options to display the Parameter Settings form.

2. Choose the Receivables tab.

Parameter Settings > Receivables Tab with Enable Statements Branch Selection Highlighted

3. Choose the Enable Statements Branch Selection check box.

4. Choose Process (F12) to save this setting.

Setting up Filtering Statements by Branch

After you set the Enable Statements Branch Selection parameter, you can set the AR Branch and/or Report Branch lists for each charge account record. The charge setting is required, but warning messages display if you do not set the AR Branch and Report Branch settings after the parameter is enabled. The application gives you a way to group charge account statements using these settings.

To set an account’s branch statement settings:

1. From the Main Menu, choose Point of Sale > Database > Account to display the Account Maintenance form.

2. From the Account list, choose the account you want to set the new settings for. The account record displays.

Account Maintenance with AR Branch Setting Highlighted

3. In the Receivables tab, set the AR Branch entry to the branch you want to use to generate the account’s statements.

4. Choose the Codes tab to display new options.

Account Maintenance > Codes Tab > Report Branch Highlighted

5. Choose the Report Branch setting and do one of the following:

  • Select the same branch as the AR Branch to ensure the account statement is generated using the same branch using either statement setting,

    OR

  • Select a different branch if there are cases you want to generate statements for this account using a different branch setting.

6. When you have completed your selections, choose Process (F12) to update the account record.

Note: If you process the Account Maintenance form without these settings, warning messages display to prompt these entries.

Using the Branch Filters to Produce Statements

After you select the AR Branch and/or Report Branch settings in the charge account records, these settings determine which statements print when you generate your billing statements by branch. These statements can be for Open Item or Balance Forward posting types.

To generate the monthly statements by a specific branch:

1. From the Main Menu, choose Receivables > Statements to display the Billing Statements form.

Billing statements Form > Unassigned Branch and Account AR Branch/Branch list

In the previous figure, we highlighted the Unassigned Branch entry because this is a new field type. You select this check box to create statements for accounts that do not have AR Branch or Report Branch settings.

Note: If you do not set the Enable Statements Branch Selection parameter discussed in Setting the Branch Statement Filter Parameter, the Account Report Branch and Account AR Branch/Branch List options do not display.

2. In the Selection list, choose All Accounts.

3. In the Print Options section, choose the statement printing options you want for this task.

4. From the Include list, choose the delivery option(s) for the selected statements.

5. Consider the Account Report Branch and/or the Account AR Branch statement selection options and choose among these options to generate the statements you want:

  • To produce statements for the selected accounts with unassigned branches, choose the Unassigned Branch check box and no other check boxes (in the Account Report Branch).

    Note: You can use this setting to find accounts that are missing these settings or to generate statements for accounts that have no AR Branch or Report Branch settings.

  • To produce statements for accounts with one or more Report Branch settings, choose the branch check box(es) from the Account Report Branch list.

  • To produce statements for accounts with one AR Branch setting, choose the branch from the Account AR Branch/Branch List.

  • To produce statements for a combination of Report Branches and AR Branches, choose the Account Report Branch check boxes and select a branch in the Account AR Branch/Branch List.

    Note: When you use this option, the application ensures that any branches are in both lists are not duplicated.

  • To produce statements for all selected accounts and for all branches based on the Report Branch setting, choose the Select All button. This selection includes the Unassigned Branch statements.

  • To produce statements as you did before, do not select any branch settings in the Account Report Branch list or the Account AR Branch/Branch List.

6. In the Transit Options field, click the Ellipsis button to attach a flier to each of the statements you are preparing for the customer.

This step is not required.

7. When these settings are complete, choose Process (F12) to begin generating the statements. The Generating Statements box shows the progress:

Billing Statements > Generating Statements Message

The application creates a processing log that contains records of every statement it produces. If there is an error, the application adds the error to an error log, which you can review at the end of the process.

8. As the application processes the statements you have requested, messages display to explain the status of the process and give you choices about displaying or hiding the messages. Messages like:

Billing Statements > Error Message

9. If you get an error, choose:

  • Continue to continue the statement processing, or

  • Cancel to stop the statement processing until you have cleared the issue.

Then the application asks you whether to keep displaying error messages or just give you a list at the end.

10. When you get the Inhibit Error Messages prompt, choose:

  • Show to see the error messages and choose as you go to complete the statement process, or

  • Hide to complete the statement creation process and handle the exceptions afterwards. The application saves a list of the issues and logs as indicated in the next message for your review.

11. When the Statement process is complete, the Statement Delivery Results display. The application saves the list of errors and a process log in separate files with the date and time stamp in an accessible folder:

Billing Statements > Statement Delivery Results

12. From here, you can click:

  • View Exceptions, to open the log that contains the errors the process recorded

  • View Full Log, to open the log of the entire statement process

  • Done, and review the results you have printed, sent via email or fax manually

  • Browse Logs, to go to the folder that contains the exceptions and process log and review them manually.