AnyWare Physical Counts
You can use the AnyWare Physical Counts feature to enter and save inventory counts for items in your storage location. This amounts to the same features as the Enter Counts area of the RockSolid MAX application. AnyWare saves the item counts you add immediately upon processing; however, on-hand adjustments are not made until counts are posted into the application (using the Post Physical Counts utility from the Inventory area). Counts are cumulative until posting.
For example, regardless of whether different users enter counts for an item at the same time, or the same user saves separate counts for one item, those counts will be added together upon processing.
From the time an item count is first saved (or the item is “initialized”) until the count is posted (applied/finalized), the RockSolid MAX application records the net change in on-hand from any activity occurring for the item. This quantity is adjusted out of the adjustment to the item’s on-hand. For this reason, it is very important that you complete all counting before any sales, receipts, or other activities that affect on-hand counts for the items occur. The reason this is important it because we do not track every on-hand change relative to the timing of every individual count. This therefore implies an assumption that on-hand changes occurred after all counting was completed and not before.
Tracking is enabled as soon as the first count is processed or the item/inventory is initialized. The benefit to this feature is that it allows counts to be entered while your company is operating (open) as long as those counts were collected before any activity occurred that would affect the counted items’ on-hand values. For more information about physical inventory, please refer to the Help in the application.
When entering or modifying items, the upper form displays information regarding the item’s current on-hand, previous count (if any), quantity sold/received, weighted average cost, group section, and the current variance (diff %). This same information is displayed in the grid after entry. AnyWare only displays and populates the Previous Count, Sold/Received, and Variance (Diff %) when the item has active counts or the item is currently initialized.
Note: You may have to slide the grid to the left to view the additional columns depending upon the size and resolution of your device's display screen.
Specifying a Name and Location
Just as in the RockSolid MAX application, users can optionally designate a name and location to be associated with the Physical Count document which will be created upon processing (F12). This information is just for easy reference on the document. AnyWare also records the user name and station that create each document automatically.
To specify a name and/or location, click the Folder icon that displays near the bottom of the form. This slides open the folder which contain the name and location fields. To close the folder, tap the icon again.
Importing Items by Group/Section or Location
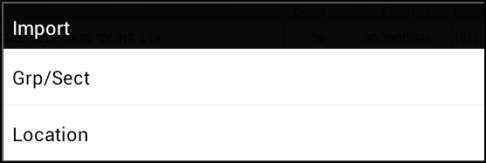
You can also use the Import option to select items by Group/Section or Location Code. Keep in mind that copying large quantities of items may pose issues, due to the possibility of losing a wireless connection. We recommend that you process smaller batches to minimize the possibility of losing work. You can repeat the import process and use either or both options.

Import Name and Location Options by Group/Section and Location Code Menu
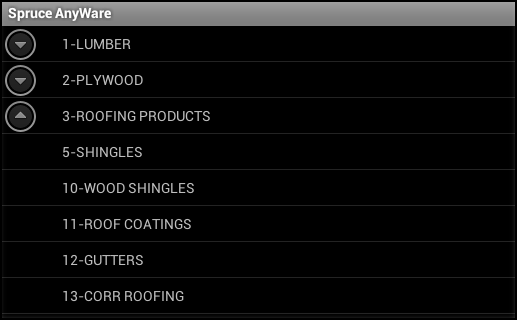
To select an item by Group/Section, choose the Grp/Sect (Group-Section) option to display a list of expandable groups. Tap on the arrow with the circle to expand a group and view the sections. Select a section to import the items assigned to that group and section. Import only one per group and section at a time.

Group/Section List
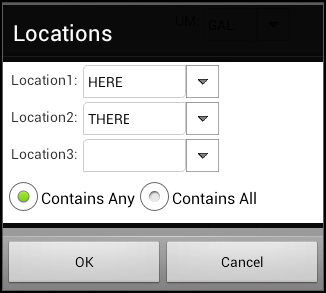
To select an item by Location, choose the Location option to display the Location dialog box. You can specify up to 3 locations and choose whether any or all locations you specify are to be matched against.
-
Choosing Contains Any brings in items that belong to any location you have specified, but not necessarily be assigned to all the locations.
-
Choosing Contains All only imports items that are each assigned to every location you have specified

Counts are not automatically set for imported items. You need o modify each item and enter a count in the upper form. You cannot make changes directly in the grid.
Scanning Items
You can scan items using the Physical Counts app if you have a supported scanning app installed on your device. Choose Scan from the menu. If you haven't installed scanning, the AnyWare will prompt you to install the necessary app when you choose this option.
Item Entry and the Grid
Just as with other AnyWare feature that offers an item grid, Physical Counts uses the same methods for adding, modifying, and deleting items from the grid. After entering a new item in the upper area of the form, use either the Add (A), Modify (M), or Delete (X) buttons along the left-hand side of the grid - or - instead, long press in the grid area to display a menu with Add, Modify, and Delete options. Tapping an existing row in the grid is used for selecting that row for modification or deletion using the “menu” we just described.
Processing
To save the counts you enter, choose Process from the menu. A form displays that can require printer selection to print a session document.
If your phone and tablet device cannot print directly, you can complete the print processing via submission of the print job to a printer configured on the local print server.
This means that any printers that should be available to AnyWare users need to be configured appropriately on the server.