Account Payment Notification
The Account Payment Notification process emails your customers payment-specific details when you process account or ecommerce payments. This notification is helpful for customers who pay by check as they will know when funds are leaving their bank accounts. This notification is also beneficial for customers who use a Card on File to pay their balances, as they know when you have applied the payment to their card.
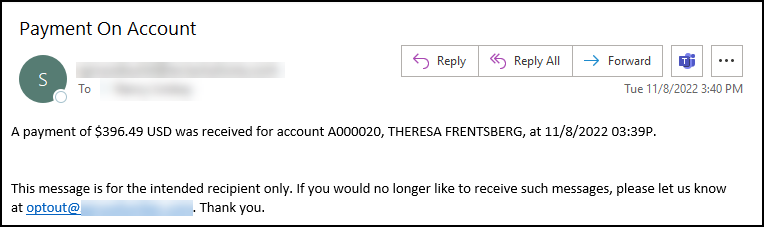
After you set up this feature, the application sends out email notifications to the main contact at enabled accounts to explain how much you applied to their account or job and when you posted the payment. The notification message reads:
-
A payment of <amount> was received for the account <account number>, <account name> at <date, time>.
When you process a notification for an account’s job, the message reads:
-
A payment of <amount> was received for the account-job <account number>-<job number>, <job name> at <date, time>.
Note: If your customer pays you in a foreign currency, the appropriate currency codes and symbols display in the email messages.
We have added this feature to Receivables > Posting, Receivables > Payment Entry, and when you process payments using Point of Sale > Payments. This email is a notification only; the application does not send statements as part of this process. If the notification fails, it does not affect the payment processing.
This feature relies on the master contact email setting for the account, so it makes sense to ensure these settings are complete before you get started. When you send these notifications, you can also add one or more automatic-reply email addresses that customers can use to respond to these notifications.
Note: Currently, you can only send these payment notifications to the master contact email and not to additional email addresses.
Setting the Notification Response Parameters
You must have administrative permissions to set these parameter options. The application cannot send specific account payment notification emails without these settings.
To enable payment notification and set the reply to address(es):
1. From the Main Menu, choose Maintenance > Database > Parameters to display the Parameter Settings form.
2. Choose the Notify > External tabs to display the notification settings:
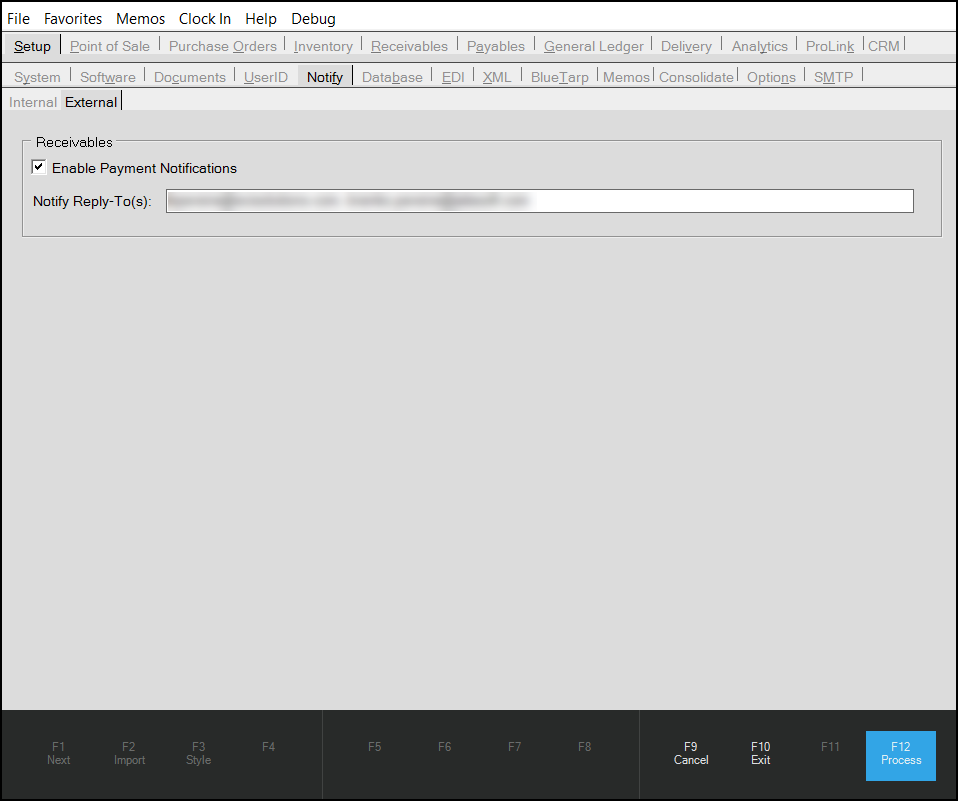
Parameter Settings > Setup > Notify > External Tab
3. In the Receivables box, choose the Enable Payment Notifications check box to set this parameter. You select this check box to enable payment notifications.
4. In the Notify Reply-To(s) field, enter the email address of the person who should receive replies to these emails. If you do not enter an email address, the application uses the “From” email address to send the message from your company.
Note: The application only allows valid email addresses. Errors display if the email address is not in a valid format.
5. When you have completed these entries, choose Process (F12).
Enabling Payment Notification for an Account
After the feature is enabled, you can add this notification option to an account individually or globally using the instructions in this setting. Ensure the account has a master contact record with a valid email address before enabling this setting. The application checks for a valid email address, and displays an error if there is no email address present.
To set the payment notification option for an account:
1. From the Main Menu, choose Point of Sale > Database > Account to display the Account Maintenance form.
2. From the Account list, choose the account you want to set the payment notification for.
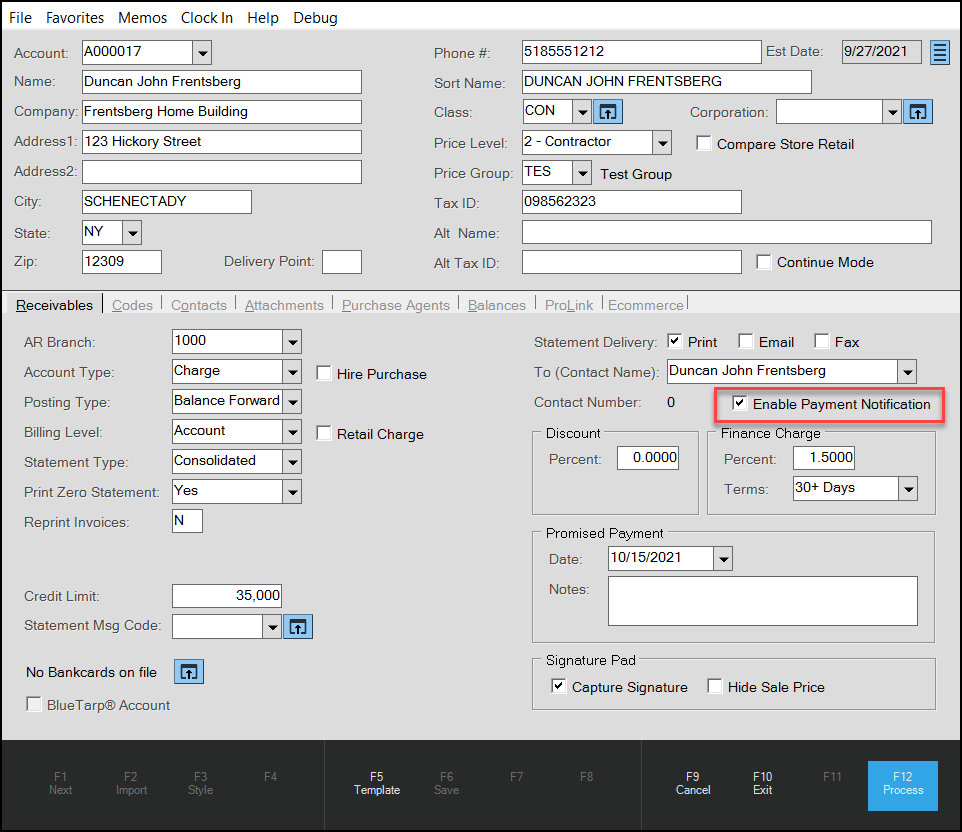
Account Maintenance > Receivables Tab > Enable Payment Notification Highlighted
3. On the Contacts tab, check to make sure the Master Contact record contains a valid email address. This entry has to be present to enable payment notification. If you change a contact record during this process, choose Save (F6) to save the changes before you move on.
4. In the Receivables tab, in the To (Contact Name) list, select the contact record to which the notification should be sent.
5. Select the Enable Payment Notification check box.
6. Choose Process (F12) to save this setting.
Enabling Payment Notification for Multiple Accounts
It would take a long time to set the Payment Notification option for each account individually, so we have added new functionality to the Global Modify feature so you can set this option for your selected accounts.
To set payment notification options for multiple accounts:
1. From the Main Menu, choose Point of Sale > Utilities > Maintenance > Account Global Modify to display the Account Global Modify form.
2. From the Field Name list, choose Payment Notification.
3. From the New Value list, select Y.
This sets the payment notification to Yes; this option is set to No by default.
4. In the Filter section, select the criteria to find the accounts you want to change the payment notification setting for or select the All Accounts check box.
5. Choose View (F8) to display the accounts that match your search criteria.
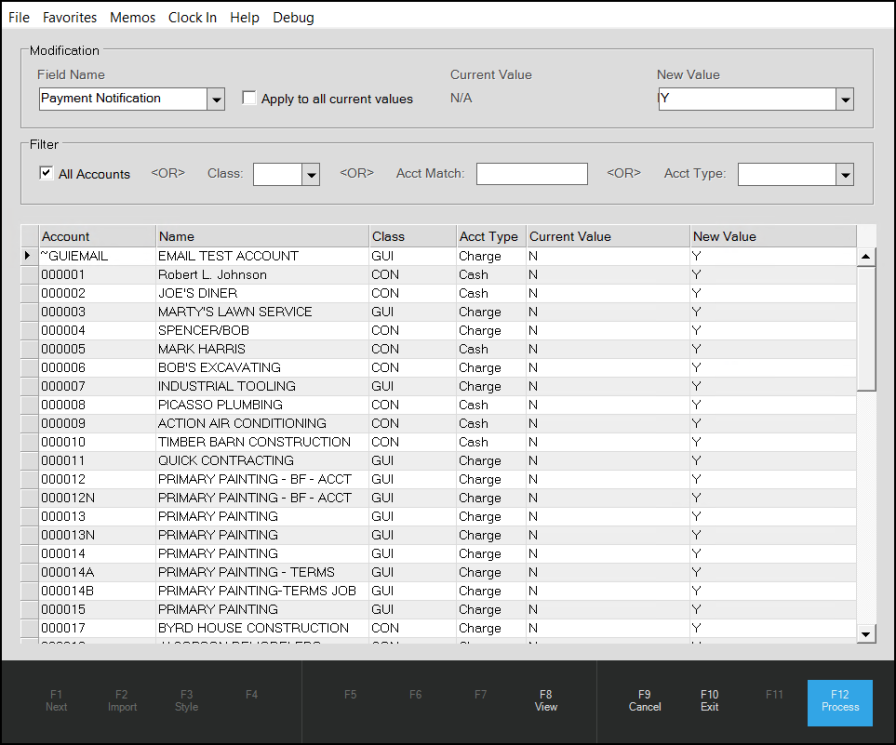
Account Global Modify > Payment Notification > Results
6. Look through the listed accounts to see if there are any accounts you do not want to send notifications to and if so, do one of the following:
-
Reset the criteria to display a different set of accounts, or
-
Make a list of the accounts you don’t want to send payment notification emails to. Complete the Account Global Modify process for all the selected accounts.
Reset the Payment Notification option for the individual accounts on your list using the instructions here.
7. To set the payment notification for the selected accounts, choose Process (F12).
Notifying Customers when Using Receivables > Payment Entry
After you set the parameter and enable the accounts, the application sets the Email Document flag for the account when you process a payment in the Receivables > Payment Entry form.
To see this feature in action:
1. From the Main Menu, choose Receivables > Payment Entry to display the Payment Entry form.
2. In the data grid, enter the payment information for the account as you usually would.
3. When you choose Process (F12), the Process Session Document displays, as usual.
4. Click the Transmit tab to display the new settings.
Receivables > Payment Entry > Process Session Document with Entries
The application sets the Email Document check box by default for these accounts. The Subject line reads, Payment On Account and the Notes section contains the details of the payment you processed. The payment values display in the customer’s currency.
5. When you are ready to send this email, choose Finish (F12). One of these events occurs:
-
If the application can send the notification, the application displays an <email address> queued confirmation message.
-
If the application cannot send the notification, an error message displays.
Notifying Users when using Receivables > Posting
The process is similar when posting a payment to an account using Receivables > Posting.
1. From the Main Menu, choose Receivables > Posting to display the Posting Payments form.
2. From the Account list, choose the account you want to post a payment from.
3. Review the account and apply any discounts or other modifications as you normally would.
4. Choose Payment (F5) and enter the customer’s payment information, and click Accept.
The application displays the message:
-
Payment Notification message queued.
The customer receives the email message, based on the transaction you completed.
Payment On Account Email Message