Sending your AR and Vendor Data to QuickBooks Online
At ECI, we want to empower your RockSolid MAX businesses to transmit your chart of accounts data we collect in the application to your QuickBooks Online account. For the first release, we are building a one-way integration process that pushes your End-of-Day RockSolid MAX account data, including accounts receivable and accounts payable debits, credits, and journal entries directly to your QuickBooks Online chart of accounts. The Implementation team works with your business to upload the previous year's general ledger journal data, and make sure your GL data and your settings in QuickBooks Online match. After that, a nightly update process runs after the End-of-Day report completes and applies the previous day’s changes to your established journal records in QuickBooks Online. The data sync process will run automatically at 5:00 a.m. (EST) each day.
Note: This feature is not available for QuickBooks Desktop.
What will this mean for your Business?
Sending your RockSolid MAX accounts receivable and vendor payment data to your QuickBooks Online account will help you balance your books using a tool you already know. No more entering general ledger information manually, with all the challenges that manual entry can introduce. The uploaded data is based on your own established chart of accounts and fully traceable back to RockSolid MAX.
Initially, this QuickBooks Online integration will be available for a single branch (a single legal entity) in the United States only, but we will add Canadian QuickBooks Online support in a future release. We will also move to a multi-entity business model in the future.
Keep in mind that there is no new feature setup for this process, because the application is already capturing this information automatically. The nightly data transmission process simply collects the new data and uploads it to the accounts you have already established in your QuickBooks Online chart of accounts.
You will not upload individual customer and vendor accounts to QuickBooks Online at this time.
Getting Started with QuickBooks Online Integration
Contact your ECI Aftermarket Account Manager to get started. Data Engineers and Implementation team members will work with you to confirm that your data and your infrastructure is in place to ensure data safety and integrity as you move into this model. This will require secure admin access to your QuickBooks Online account. The infrastructure for this QuickBooks Online integration is complex because we are committed to ensuring that other third parties cannot access the information you send to your QuickBooks Online account. You will not upload individual customer and vendor accounts to QuickBooks Online at this time.
Here is a list of prerequisites that you need to have in place to ensure the success of this integration:
1. Use the End-of-Day Process as part of your RockSolid MAX integration.
Your business must be using the End-of-Day (EOD) process (based on the EOD_GL_MAIN stored procedure) as part of your RockSolid MAX implementation. Your team should work with our Database Administrators to provide formal signoffs for any job changes to the queue/logging procedures.
2. Your QuickBooks Online instance must have a Chart of Accounts configured.
We recommend comparing your current journal settings in your QuickBooks Online Chart of Accounts with those in RockSolid MAX, then updating the QuickBooks Online entries to ensure they match. Inconsistencies will result in misaligned, inconsistent reports. The Implementation team can work with you to ensure the mapping is aligned.
3. Add a default QuickBooks Online account for AR and AP Data.
Using the instructions below, add the RSMax – Customer and RSMax – Vendor accounts to your QuickBooks Online platform. This is where the nightly process will add your Accounts Receivable and Accounts Payable data.
4. Implementation/Support can then enable the QuickBooks Online Parameter in RockSolid MAX.
After you complete these three requirements, the Implementation team will review these settings with you and enable the QuickBooks Online parameter in the system to begin the process.
5. Specify the Fiscal Year Start Date for your Business.
Work with your Implementation or Support team member to map your RockSolid MAX GL journals to your QuickBooks Online general ledger and supply the fiscal year start date to them to start the onboarding process. They can then log into the QuickBooks Online Admin account and work with you to map your current securely upload the previous years' journal entries to the RSMax – Customer and RSMax – Vendor account data.
After the End-of-Day process completes, RockSolid MAX will upload the Accounts Receivable and Accounts Payable debits, credits, and journal entries securely each morning at 5 a.m. EST.
What Syncs Initially / What is the Future Plan?
In the first release, we will be focusing on adding support for a single branch:
| Scope for the First Release | Scope for the Future Releases |
|---|---|
| Configurable, many-to-one account mapping | True customer / vendor entity mapping |
| Branch-tagged journal entries for per-branch profit and loss |
Detail mapping for Group/Sections item data Bankcard-based transaction splitting |
| One-way daily push, at 5 a.m. EST | Real-time or intraday sync |
There are some known limitations for the initial release:
-
Customer and Vendor placeholders.
QuickBooks Online requires AR/AP entries to be tied to a customer or a vendor. For the initial release, we are tying these records to a single default placeholder. We are deferring entity mapping because pulling and reconciling customer and vendor records is complex. We also need to account for cases where a customer or a vendor does not exist.
-
Initially, the uploaded data will be from the previous day.
Existing RockSolid MAX ActiveReports for GL activity are also journal-driven, so the two should agree — but currently, this is not real time.
-
No Bank Card Splitting.
The application cannot parse the bank card splitting-based transactions at this time. -
AR Data stays in the application.
Journal entries, such as invoices and receipts are uploaded in the first release.
Adding a Customer Record to your QuickBooks Online Chart of Accounts
After you sign up for the QuickBooks Online integration, add a Customer record to your QuickBooks Online account. The application will upload your Accounts Receivable data nightly to this customer record so you can update your AR journal entries. You must enter this text exactly as it is shown below to ensure a successful upload of your data. When you review the uploaded data, you will see individual transactions, but not the account names.
To add the Customer record to your QuickBooks Online chart of accounts:
1. Log into your QuickBooks Online account.
2. From the Left Menu, click the Create  icon.
3. From the list that displays, choose Add customer. The Add Customer form displays.
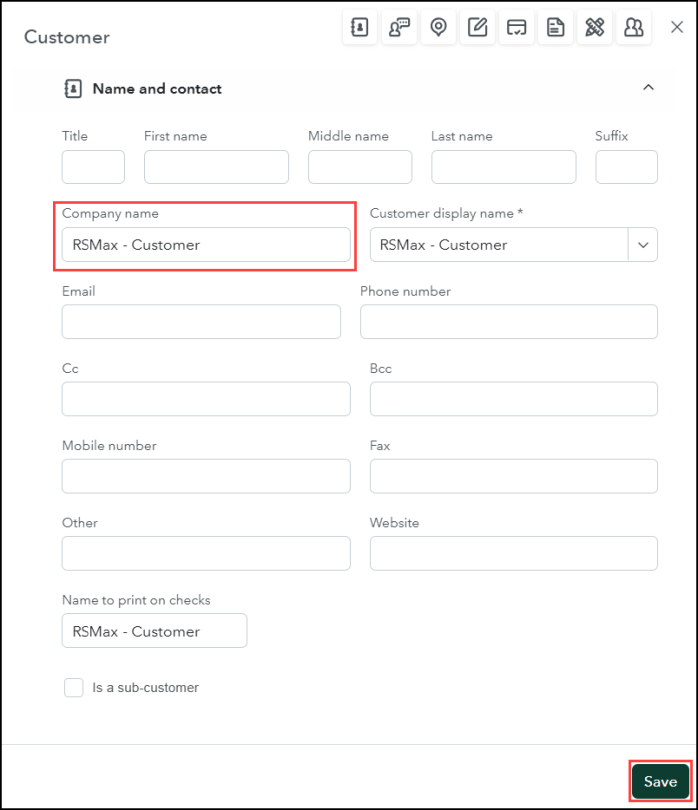
QuickBooks Online > Add Customer > RSMax - Customer Entry
4. In the Company Name field, enter this text exactly (this is case-sensitive):
RSMax – Customer
5. Click Save.
After you save this entry, you will be able to see the status of your RockSolid MAX AR accounts after the uploads begin.
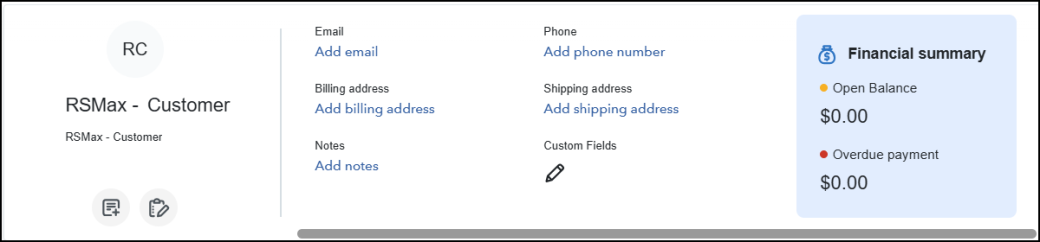
QuickBooks Online > Add Customer > RSMax - Customer Entry Financial Summary (Initial)
Adding a Vendor Record to your QuickBooks Online Chart of Accounts
In addition to tracking the incoming revenue from your customers, you can upload the inventory, purchase order, and vendor financials stored in RockSolid MAX to manage your inventory expenses and bills in your QuickBooks Online account. Follow the instructions below to set up a default QuickBooks Online vendor account to receive your RockSolid MAX data. This placeholder will hold all RockSolid MAX-based vendor data you import.
To add a vendor record to your QuickBooks Online chart of accounts:
1. Log in to your QuickBooks Online account.
2. From the Left Menu, click the Create icon.
3. At the bottom of the Vendors list, choose Add vendor.
The Keep track of who you pay box displays
4. Click Add Vendor to display the Vendor form.
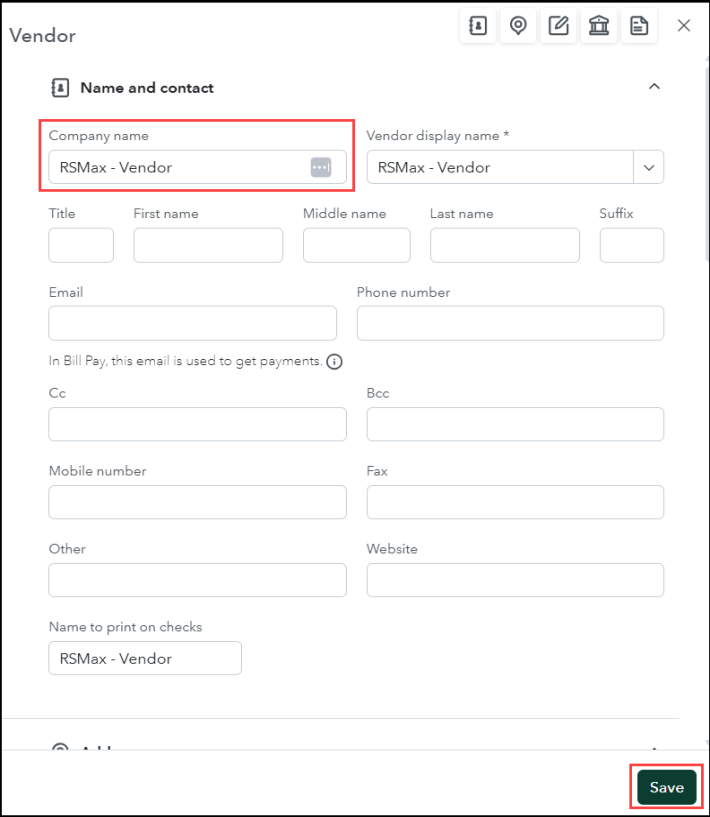
QuickBooks Online > Add Vendor > RSMax - Vendor Entry
5. In the Company name field, enter this text exactly (this is case-sensitive):
RSMax - Vendor
6. Click Save to save this entry. The Vendor record displays.

QuickBooks Online > Add Vendor > RSMax - Vendor Financial Summary (Initial)
Working with Implementation to Set Up QuickBooks Integration
When your Customer and Vendor settings are complete, you can work with the Implementation and Support team to map your RockSolid MAX GL journal accounts to your QuickBooks Online accounts. As part of the on-boarding process for this feature, authorized ECI team members have Admin access to your QuickBooks Online account to support you in the account mapping process. Using their QuickBooks Online Configuration Tool, they can see your latest GL account settings in RockSolid MAX and help you map them to the GL Accounts in your QuickBooks Online instance. You can provide a detailed list of the GL journal accounts in RockSolid MAX and specify the QuickBooks Online accounts you want them to map to, or set up a shared work session to choose these settings together.
When all of the RockSolid MAX accounts are aligned with the QuickBooks Online accounts, and you have specified the previous year’s Fiscal Year Start date, you have created the foundation for the first transmission of your chart of accounts data to your QuickBooks Online account. When each transmission is complete, continue to the next session to see how your data looks in QuickBooks Online!
Viewing your RockSolid MAX Financials in QuickBooks Online
After the nightly process uploads accounts receivable payments and vendor invoice information to your QuickBooks Online account overnight, you can review the transaction data that occurred after the Fiscal Year Start date you specified for the QuickBooks Online account.
To review the accounts receivable payment data in your QuickBooks Online instance:
1. Log into your QuickBooks Online account.
2. From the Left Menu, choose Chart of accounts. The chart of accounts entries display.
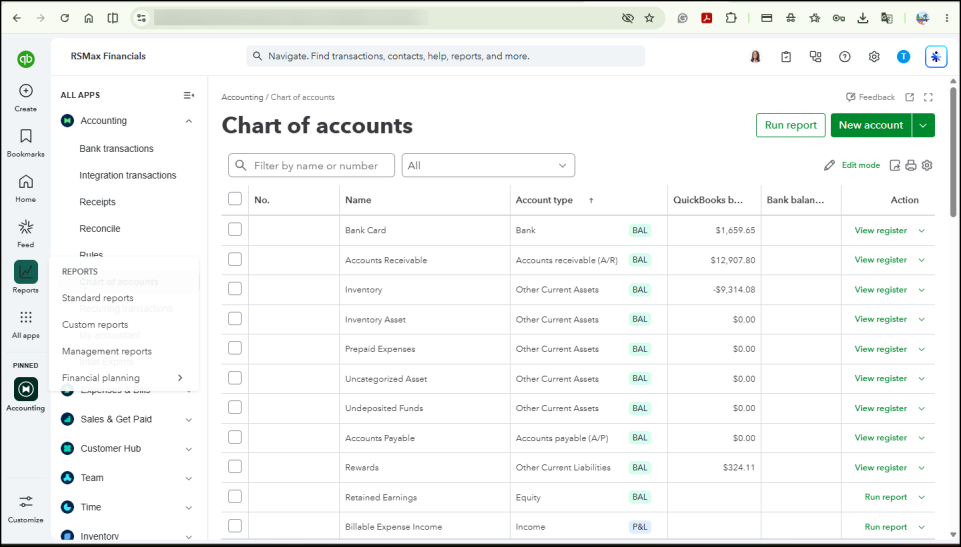
QuickBooks Online > Chart of Accounts After GL Mapping
3. You can drill into an account, for example, A/R Register, to see the journal entries pushed from RockSolid MAX.
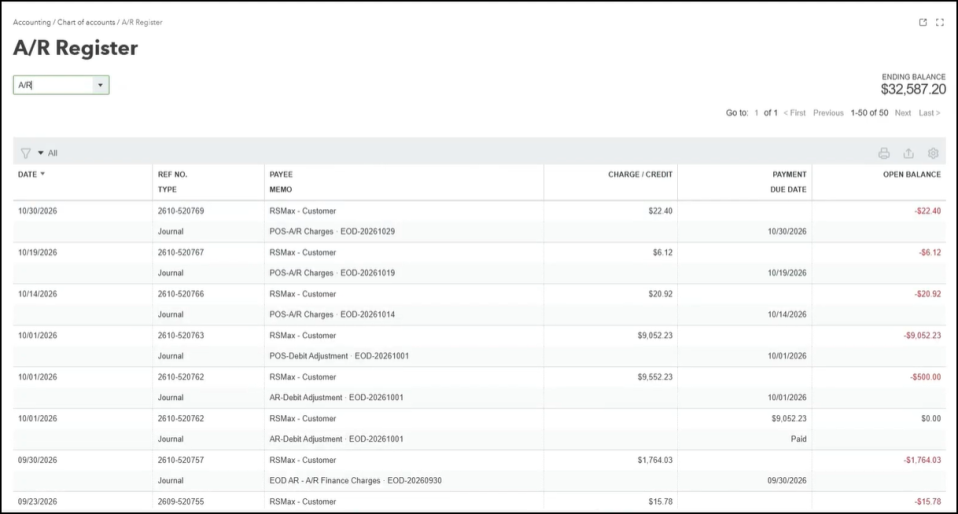
QuickBooks Online > A/R Register
4. You can use the Reference Number (REF NO.) and Type entries to look up the journal entry using the Document ID in RockSolid MAX (Documents).
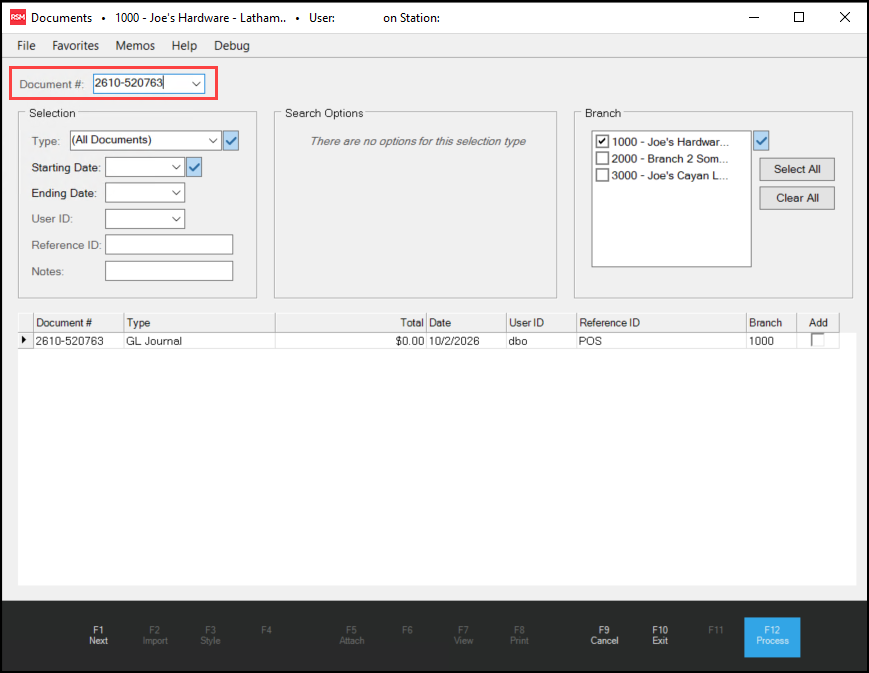
RockSolid MAX > Documents > GL Journal Entry (2610-520763)
When you press Enter, the corresponding GL Journal Document displays, showing the GL account IDs in RockSolid MAX, the description of the type of charge, and the debits and credits associated with the GL Journal entries:
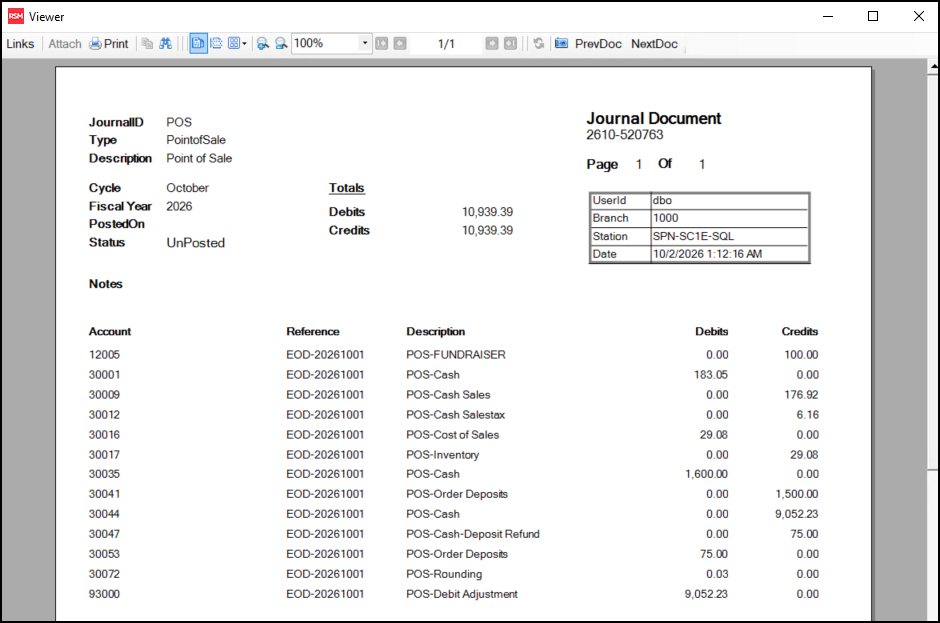
RockSolid MAX > Documents > Journal Entry Detail (2610-520763)
5. Back in QuickBooks Online, you can compare these entries with the uploaded records by clicking the Journal entry in the A/R Register:
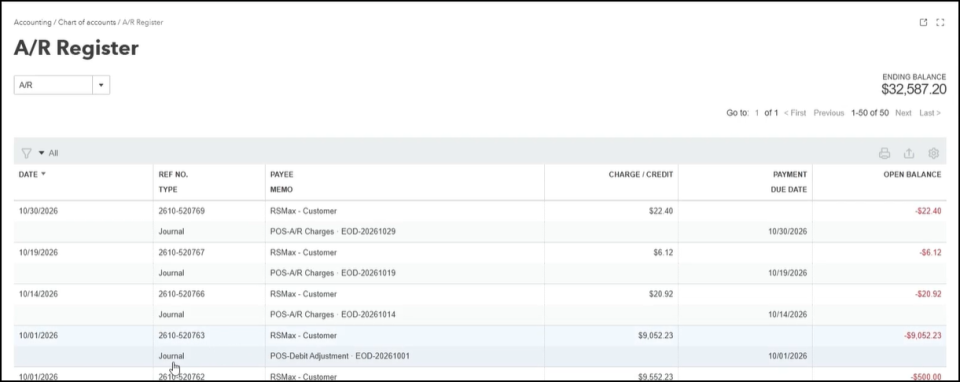
QuickBooks Online > A/R Register > GL Journal Entry (2610-520763)
The corresponding journal record displays the balanced GL data from RockSolid MAX:
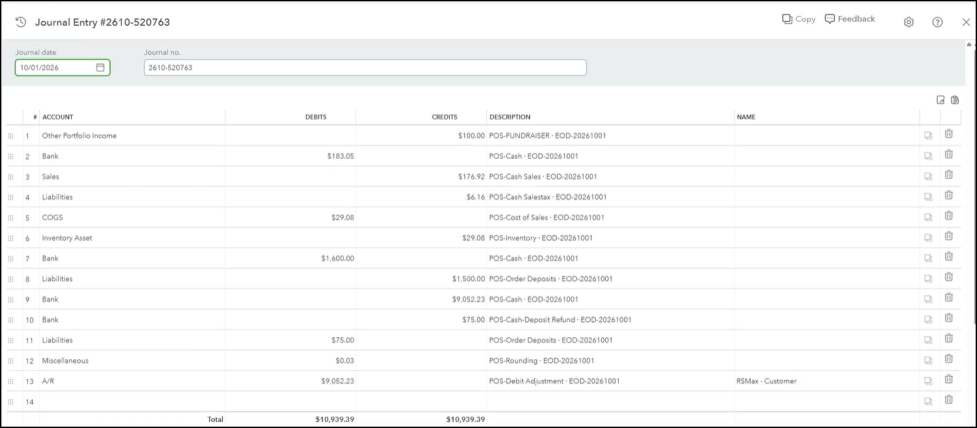
QuickBooks Online > A/R Register > Journal Entry 2610-520763
These journal entries match.
See Also:
GL Account Mapping