Using the Changes in this Release
This section explains how to use the changes in the version 29.0 and 29.1 releases:
-
To review the major feature changes in this release, see the Major Features.
-
To review defect resolutions for this release, see the Resolution Log.
Key Features:
Supporting the Moneris Platform using the Verifone P400
Making Help Better
Accessing Orgill Warehouse Quantities in Purchase Order Entry and Catalog Inquiry
Supporting the Moneris Platform using the Verifone P400 (Canada)
After you purchase the Verifone P400 devices for your Moneris platform, you can follow these instructions to add them to your stations. These changes will not affect the Ingenico IPP320 devices you still use. The Verifone P400 devices are 3DES-compliant and will be replacing the legacy IPP320 devices beginning in April 2025.
Our goal is to ensure that Moneris customers can continue to use the IPP320 devices while beginning to transition to the Verifone P400, which is leveraging the POSPAD API technology. Using this technology and a Remote Client or VPN connection, this release provides a seamless transition for your business to the P400 device.
Moneris > Verifone P400 Device
You can use the P400 to perform the same work that the IPP320 devices have, including:
-
Processing credit card, cash, and cheque transactions for sales, orders, payments, refunds, force posts, voids
Note: Also supports Card Plans with Contract IDs and Card Verification Value (CVV) codes. -
Providing gift card support (activation, sales, refunds, card balance, deactivations, card voids, close batch inquiry, close batch)
-
Tracking loyalty purchases/points, and
-
Generating receipts for all transaction types.
Setting up a Remote Client Connection for IPP320 Devices
Typically, Ingenico IPP320 devices use a VPN connection by default to access the application. If your stations already use a Remote Client connection for printing, you can extend your use of the IPP320 by setting the device up to use the Remote Client process as well. In the Device Maintenance settings for the station, specify the Use Remote Client option while setting up your IPP320 device. Make sure each station’s Remote Client settings are complete as part of this process.
To update the IPP320 device to use Remote Client settings:
1. From the Main Menu, choose Maintenance > Database > Devices. The Device Maintenance form displays.
2. From the Device Name list, choose the station the device is connected to. The form displays the current settings for the station.
3. Choose the Card Pad check box and Moneris from the Type box (if these settings are not already selected).
4. From the Device Type list, make sure IPP320 is selected and click Settings. The Moneris Device Settings box displays.
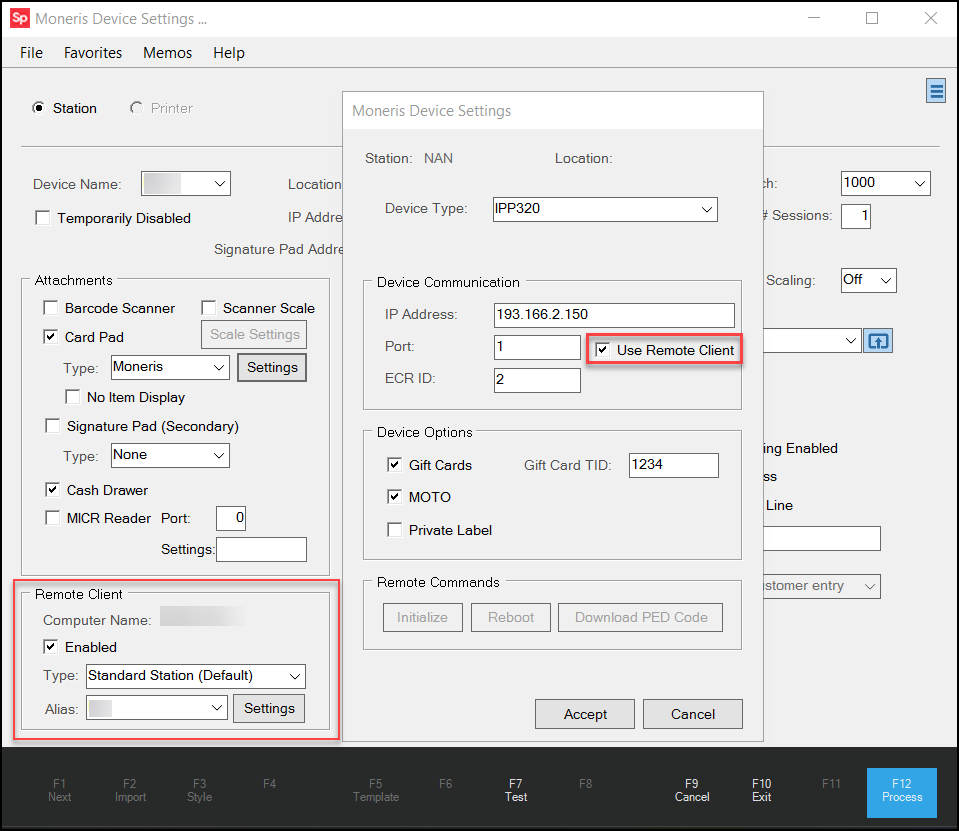
Device Maintenance > Station > Moneris Settings > Use Remote Client Check Box Enabled
5. To update your IPP320 device to use the Remote Client connection options:
-
Update the IP Address to reflect the local network connection.
-
Check the Port and ECR ID settings to ensure they are current.
-
Enable (Select) the Use Remote Client check box.
Note: If you uncheck this box later, the device reverts to the VPN connection.
6. Choose Accept to close the Moneris Device Settings box.
7. Enable the Remote Client settings for this device using the instructions in this topic or update the current entries, if needed.
8. Choose the Process (F12) key to save these settings to the database.
Adding the Verifone P400 to a Station
When you work in Point of Sale and you log into the application, you expect the payment processing device to connect to the system as well. This requires some setup in the application, which we will describe in this section.
If you are converting the station from an IPP320 to a P400, you make those changes in the Moneris Device Settings box to support the new device.
These instructions assume you have Remote Client set up for the station in your Device Maintenance form. Follow the instructions in this topic if you need to set up a new remote connection.
Note: If you revert an IPP320 to VPN after setting up the Remote Client process to connect to the device, make sure the Remote Client settings in the lower left corner are disabled if you do not use them for printing.
To add a P400 device to a station using the Remote Client process:
1. From the Main Menu, choose Maintenance > Database > Devices. The Device Maintenance form displays.
2. From the Device Name list, choose the station to add the P400 device to. The form updates to show the current device settings for the station.
3. Choose the Card Pad check box and Moneris from the Type box (if these settings are not already selected).
4. Continue based on whether you are adding a new device or replacing an existing IPP320:
-
If you are replacing an existing device, the Moneris Device Settings box displays automatically.
-
If you are adding a new device, click the Settings button to display the Moneris Device Settings box.

Moneris Device Settings Box with Verifone P400 Option Highlighted
5. From the Device Type list, choose Verifone P400.
6. Whether you are adding a new device or replacing an existing one, you can reset the Device Communication settings as needed:
-
IP Address
Enter the IP Address for the Verifone P400 device, as supplied by your network team. -
Port
Enter the Port setting for the Verifone P400 device, as defined by your network team. -
ECR ID
Enter the Cash Register ID of the device in this field.
When you complete these entries, the Initialize Device box displays.
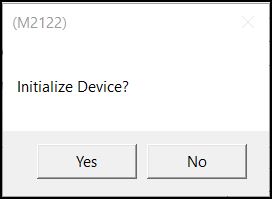
P400 Settings > Initialize Device Prompt
7. Choose Yes to begin the initialization process. An initialization message displays on the P400 device.
When initiation is successful, the message, Terminal Initialization Succeeded.
If not, review your settings to see if there are any changes required.
8. Click OK to close the initialization message.
9. Review the following options and select the check boxes of the features you need to support with this device:
-
Gift Cards
Select this option to support gift card and loyalty transactions on this device. This includes enabling gift cards, activating and deactivating them, inquiries about points and usage totals, purchases with gift cards, and returns that involve gift cards as part of the original transaction.
Note: Enter the unique transaction identifier ID in the Gift Card TID field. The gift card TID number is specific to the ECR ID number and is unique to the Moneris Pad. This is required for processing Moneris gift cards. -
MOTO
Select this option to support Mail Order/Telephone Order transactions on this device. When you enable this check box, Point of Sale can use the MOTO option in the Process Document section during the Point of Sale checkout process on P400 devices.
10. On the Moneris Device Settings box, click Accept to close the box.
11. In the Remote Client section, select the Enabled check box and leave the default Type list entry, Standard Station (Default), in place.
12. Choose Process (F12) to save these settings to the application.
The application uses the Terminal Initiation for both the Remote Client and VPN processes, these processes are just different.
Using Terminal Commands to Review the P400 Responses
The BankCard Maintenance Terminal Commands allow you to review the Remote Client and VPN responses to Moneris device changes for a particular station. Using these commands, you can review the results of many standard process changes you made to the station, including initialization, gift initialization, log on/off, PED (PIN Entry Device) details, including code download, totals reset and reboot; terminal reset, last transaction details, close batch and close batch inquiry, gift totals by card code, gift close batch and batch inquiry, and to set the English/French language settings. Moneris must be your Card Processing Interface to see these BankCard Maintenance settings.
To review the responses to terminal command options for the current station running Moneris:
1. From the Main Menu, choose Maintenance > Utilities > BankCard Maintenance. The BankCard Maintenance form displays.
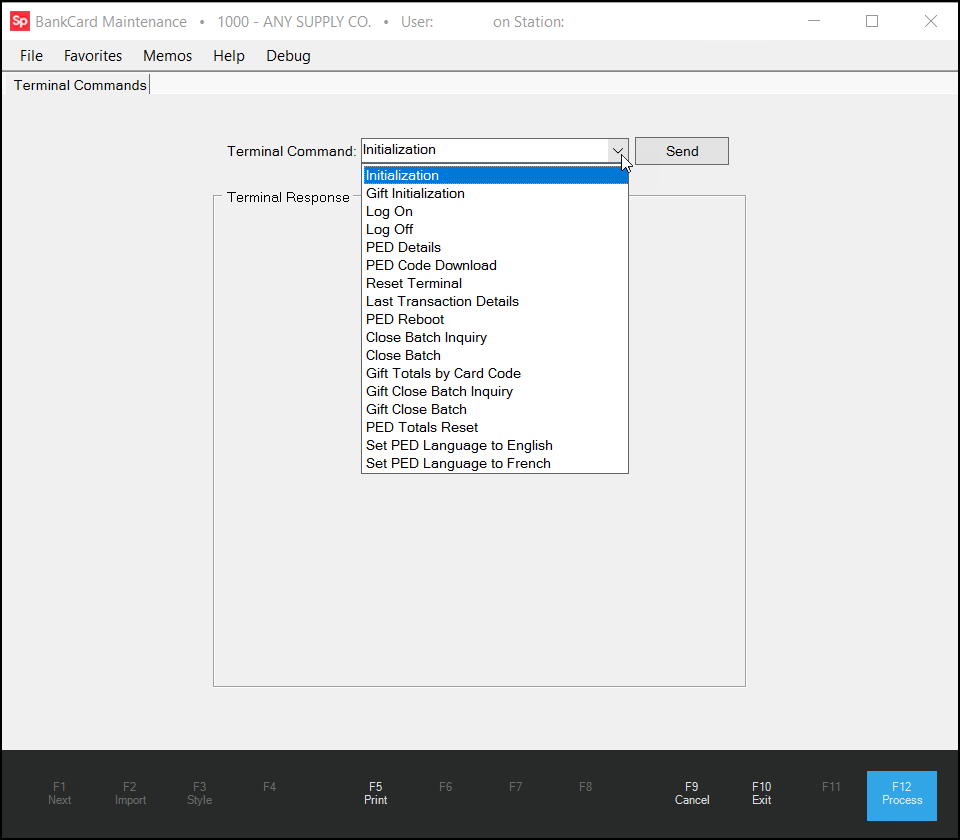
BankCard Maintenance > Terminal Command List
2. From the Terminal Command list, choose the command you implemented, to see the terminal response results. This tool works for both Remote Client or VPN responses.
3. Choose Send. The application searches for the terminal response results and displays them in a new box.
Understanding the Moneris Receipts for the P400
LBMH03-5854 – When you begin to use the P400, you may notice that the receipts’ layout is different from those you see when you are using the IPP320. These receipts have been designed by Moneris and comply with their layout requirements.
Making Help Better!
To improve our Customer Outreach, we added an email address (DocsHelp_LBMH@ecisolutions.com) to give you a voice in the Help System process. We are committed to supporting you and your business in getting the most out of your RockSolid MAX application! If there is content you want to see or if you need us to change something that is already there, send us an email with your notes. We will add your changes as soon as we can.
You can click the link in the landing topic or copy and paste the link into your email platform and let us know how we can Help!
Accessing Orgill Warehouse Quantities in Purchase Order Entry and Catalog Inquiry
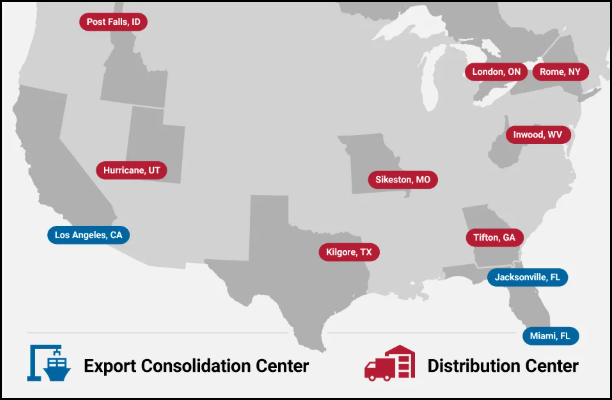
We have added a new EDI process that retrieves Orgill item quantity data for each Distribution Center (Warehouse) for dealers purchasing Orgill inventory. You can use this data to check the current availability of item quantities in each warehouse when you create Purchase Orders, and you can view this information in the Inventory Item Catalog Inquiry too.
The Orgill Warehouse Quantities retrieval process runs every hour, on the half hour during the week; there are no inventory updates sent overnight or on weekends. The EDI process retrieves the available Orgill Item SKUs, the warehouse code, and the quantity of that SKU in that warehouse. The application stores this information in the database to make it accessible to Purchasing and Inquiry.
Setting up Orgill Warehouse Hourly Retrieval Process
To set up the automated warehouse quantity retrieval process, use the instructions below. The System Administrator or any user with administrative access to the Branch Setup > EDI tab settings can complete this process to allow all branches that want to receive the hourly warehouse quantity data.
Note: You can skip this process for branches that are not selling or are not interested in Orgill inventory.
To set up the automation for the hourly Orgill Warehouse Quantity retrieval process for a branch:
1. From the Main Menu, choose Maintenance > Database > Branches. The Branch Setup form displays.
2. From the Branch ID list, choose the branch you want to enable the Orgill Warehouse Quantity data retrieval for. The branch record updates.
3. Choose the EDI tab.
4. In the Settings for list, choose the Orgill vendor record. The Orgill EDI settings display.
5. Click the Menu Marker  to display the context menu and choose Automation from the list.
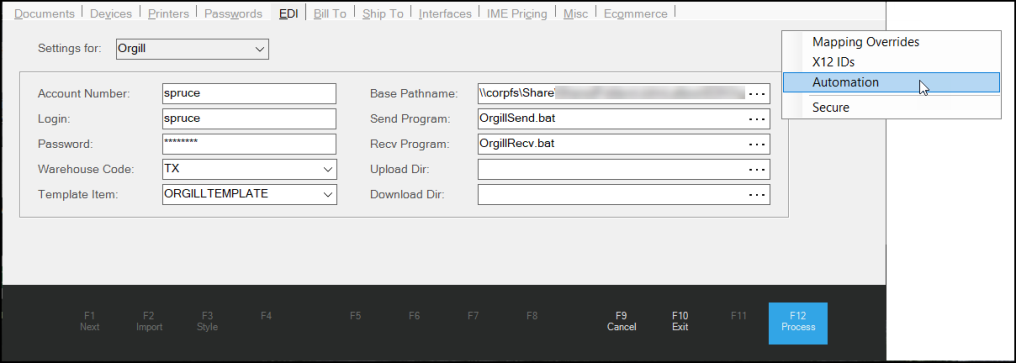
The Auto Run Schedule – Orgill box displays the branch’s current automation settings.
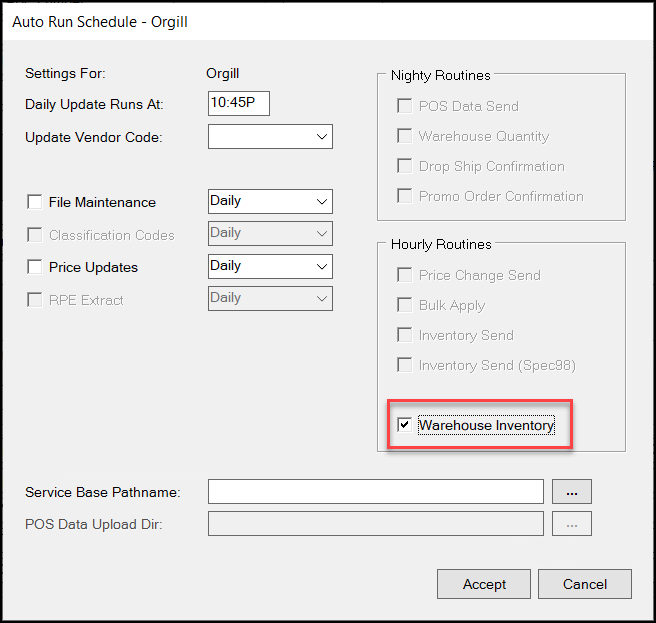
Auto Run Schedule – Orgill with Warehouse Inventory Hourly Route Highlighted
6. In the Hourly Routines box, select the Warehouse Inventory check box.
7. Choose Accept to return to the EDI tab.
8. Choose Process (F12) to save this change to the database.
9. Return to step 2 and repeat these steps for each branch for which you want to access Orgill Warehouse data.
Reviewing Orgill Warehouse Data in Purchasing Folders
Having current Orgill warehouse quantity information will be particularly helpful when you are placing orders for Orgill items your customers need. If you do not keep these items in stock, the item number from the catalog may be associated with a special order document, which you have already created for your customer.
To review the current warehouse quantity information for order entry items:
1. From the Main Menu, choose Purchasing > Order Entry. The Purchase Order Entry form displays.
2. In the PO # list, choose New to create a new purchase order.
3. From the Vendor list, choose the Orgill vendor ID.
4. In the Item column of the data grid, enter the Orgill vendor SKU of the item you want to order, or right-click the field and choose Vendor SKU, and press Enter.
-
If this is an item you keep in stock, the application will update the item entries right away. Continue to the next step.
-
If you get no results, right-click the down arrow beside the SKU ID and choose the SO Lookup option from the context list. If you have created orders for this item in the past, a list of SO Item numbers displays. Choose the SO entry you want to use to purchase the item from the list and continue to the next step.
5. Update the Quantity column entry to reflect the number of this item you need to order.
6. Click the row you added and choose the Folders (F4) key. The General folders tab displays.
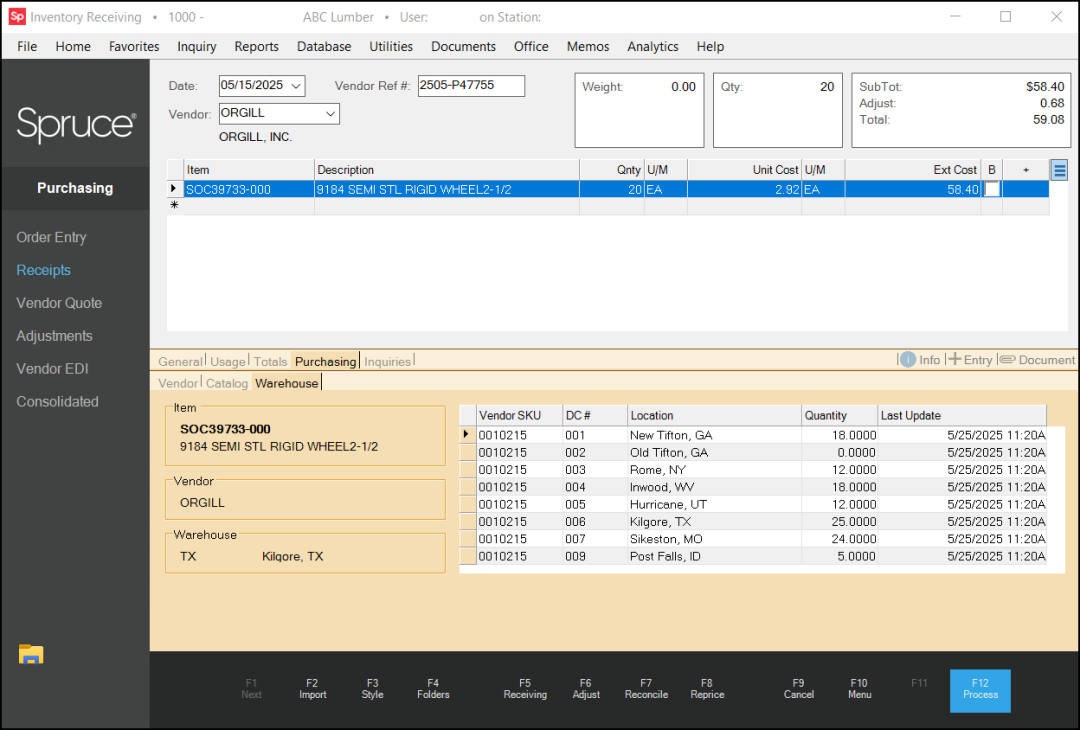
7. Click the Purchasing > Warehouse tabs to display the current warehouse inventory information for this item.
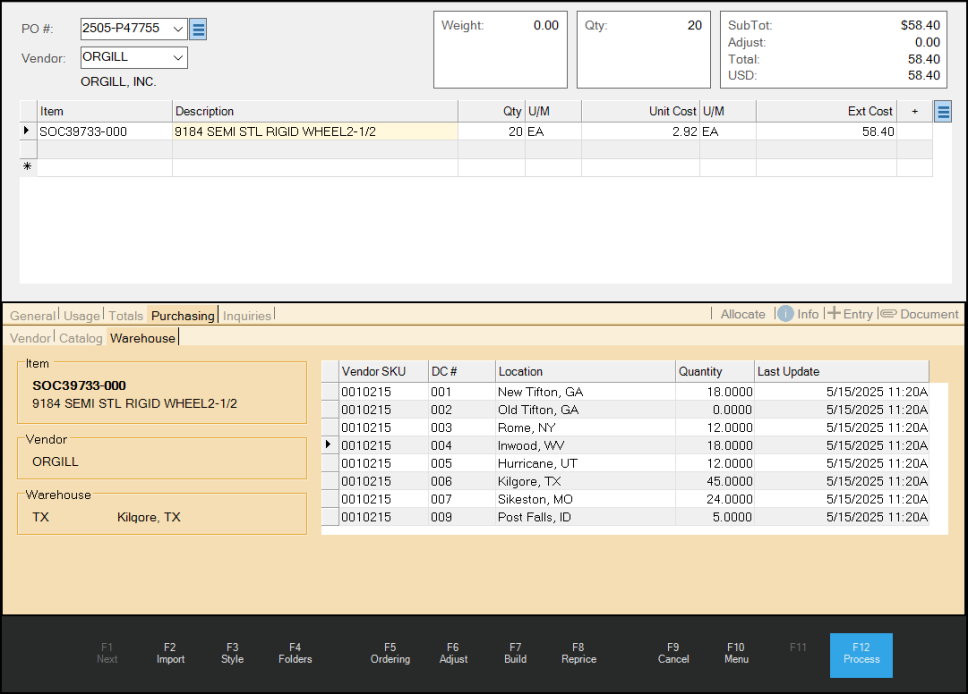
Purchase Order Entry > Orgill > Special Order Entry > Purchasing > Warehouse Details
On the Warehouse tab, the Warehouse fields list the location from which the business typically orders items.
8. You can use this list to determine whether to order the current quantity using your usual warehouse. Click the Column headers to change the order in which the list displays.
9. Complete the purchase order using the Process (F12) instructions you usually follow.
10. When you process the receipt of this order (Purchasing > Receipts, Receiving (F5)), you can use the Purchasing Tab > Warehouse tab combination again to review the warehouse quantities.
Reviewing Orgill Warehouse Data in the Vendor Catalog
After the Warehouse Quantity download has completed, you can review the updated catalog records that are stored in the Inventory > Inquiry > Catalog list.
To view the updated Vendor Catalog entries:
1. From the Main Menu, choose Inventory > Inquiry > Catalog. The Catalog Inquiry form displays.
2. From the Vendor list, choose the Orgill vendor ID.
3. From the Vendor SKU list, choose an item from the Orgill catalog.
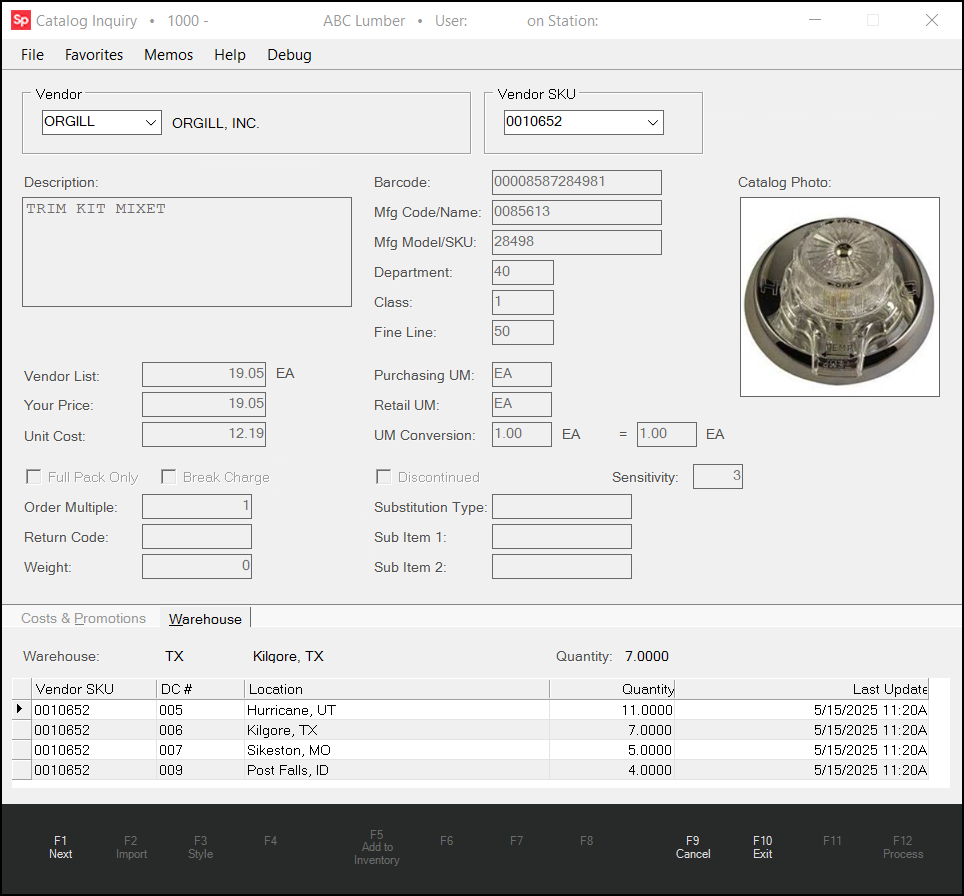
Catalog Inquiry > Orgill > Orgill Item Detail
The Catalog Inquiry form updates to show the current pricing and unit of measure details of the item you selected. The warehouse listed at the top of the Warehouse tab (in this case, Kilgore, TX) reflects the location from which the business typically orders inventory.
4. Choose the Warehouse tab to review the item quantities in each warehouse for the selected item (based on the latest update). The Last Updated field for each warehouse location updates each time the system updates the quantity. You can sort this list by clicking the column headings.